By Adrian | November 7, 2019
In my last post, after updating the blog to use TLS1.2 and adding a CAA record thinking I would clear an A+ rating, I only retained an A rating. In this post I continue the journey striving for that A+ rating.
Enabling HSTS
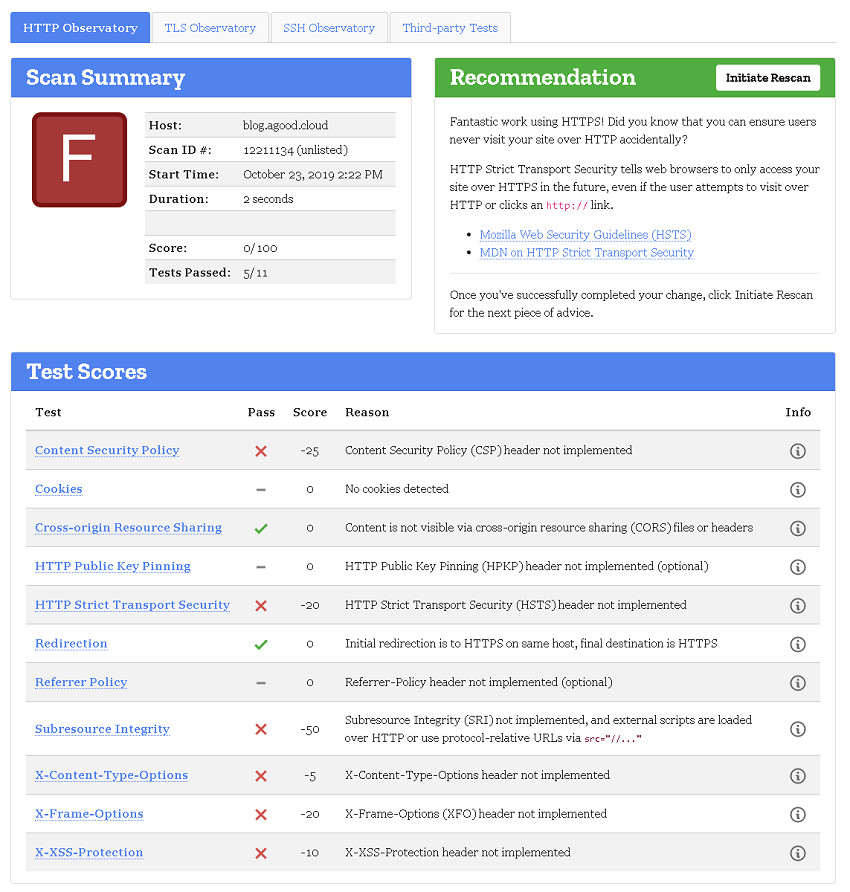
It turns out that Mozilla observatory has a test you can also run, one that looks to be way stricter and they were not as impressed giving my site an F rating with a score of zero!
So how to I go about remediating this? I need to add in some security headers, and S3/CloudFront won’t allow me to add in the required headers via their consoles.
I needed something that could sit in between the client and S3 to inject headers in. This is where Lambda@Edge comes in. Lambda@Edge is available within CloudFront so at least I have options. Enabling HSTS could be problematic so I decided that I would spin up a duplicate CloudFront instance which was pointed to an alternate DNS entry (which was then pointed at my S3 website URL) to play with this functionality. Basically I could access my blog content via a separate URL and have some sort of isolation against live site, so I could test breaking changes and not have the main blog site go up and down like a yoyo.
Create a Lambda Function
I needed to create a function in Lambda that would add the required headers and this post titled Adding HTTP Security Headers Using Lambda@Edge and Amazon CloudFront on the Amazon blogs page was just the instruction that was needed. It even included boilerplate code which is referenced below.
To add the code into Lambda and associate it with my CloudFront instance, I went to the Lambda console. I selected the AWS Region that matched the location of the website S3 bucket. Then Selected Create Function.
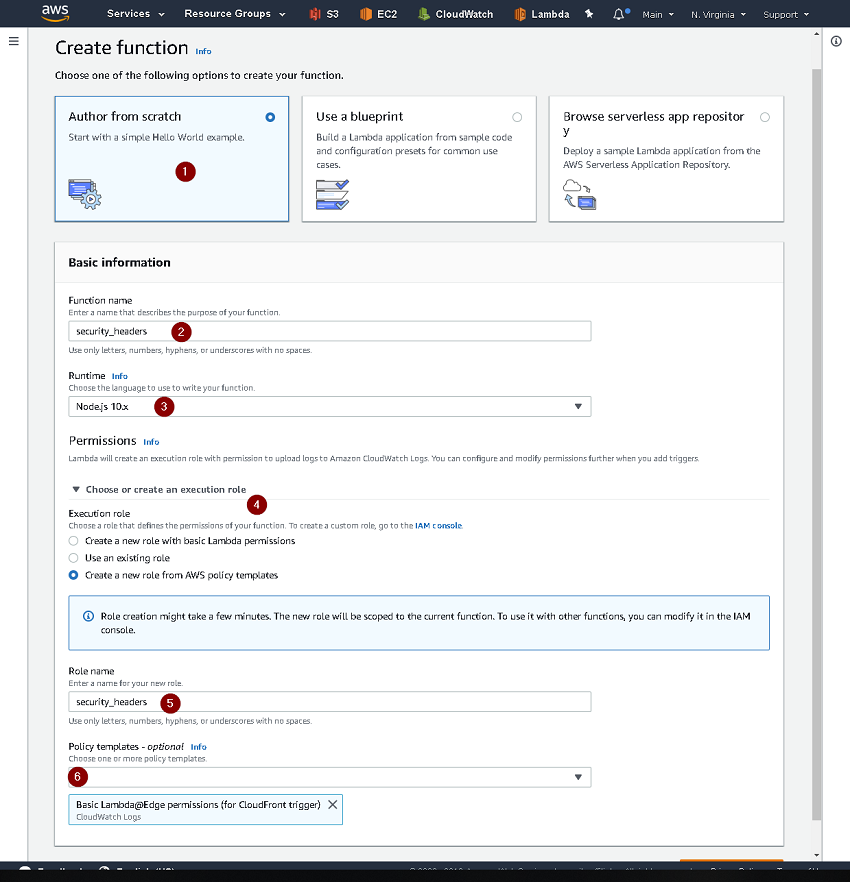
- Select
Author from scratch - Give the function a name
- Select
Node.js 10.xas the runtime - Select
Create a new role from AWS policy templates - Give the role a name
- Select
Basic Lambda@Edge permissions (for CloudFront trigger)for the policy template - Finally select
Create Function
Paste in the following boilerplate code into the Function Code section.
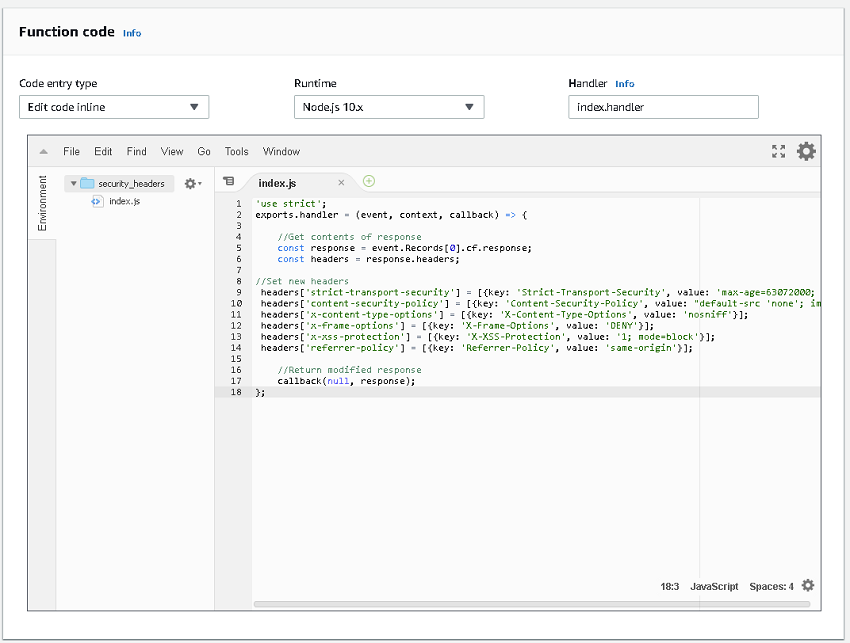
'use strict';
exports.handler = (event, context, callback) => {

    //Get contents of response
    const response = event.Records[0].cf.response;
    const headers = response.headers;

//Set new headers
 headers['strict-transport-security'] = [{key: 'Strict-Transport-Security', value: 'max-age=63072000; includeSubdomains; preload'}];
 headers['content-security-policy'] = [{key: 'Content-Security-Policy', value: "default-src 'none'; img-src 'self'; script-src 'self'; style-src 'self'; object-src 'none'"}];
 headers['x-content-type-options'] = [{key: 'X-Content-Type-Options', value: 'nosniff'}];
 headers['x-frame-options'] = [{key: 'X-Frame-Options', value: 'DENY'}];
 headers['x-xss-protection'] = [{key: 'X-XSS-Protection', value: '1; mode=block'}];
 headers['referrer-policy'] = [{key: 'Referrer-Policy', value: 'same-origin'}];

    //Return modified response
    callback(null, response);
};
Publish the Lambda Function
- Press the
Savebutton at the top right. - Select
Actions - Select
Publish new version. Add a comment and pressPublish - Copy the
ARNas you will need this for CloudFront.
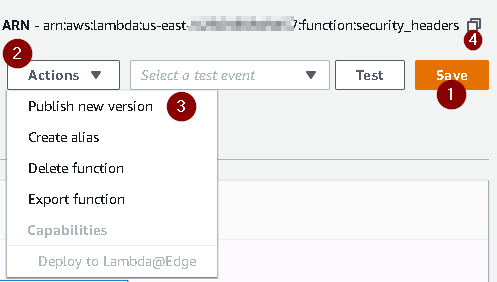
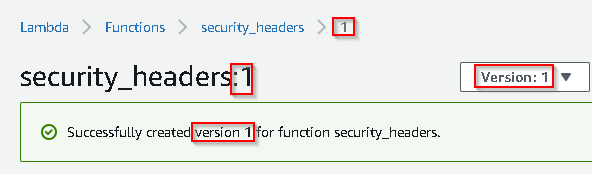
Note: In case you missed it, this is version :1
Add the Function to CloudFront
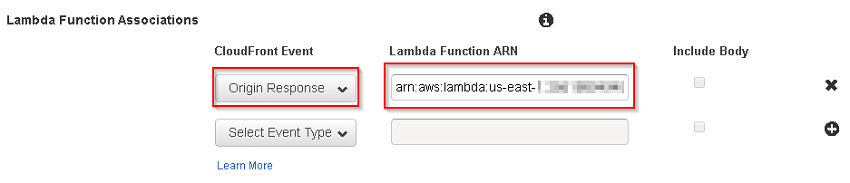
Back in the CloudFront console, I selected my distribution, selected Behaviors, Edit and scrolled down to the bottom where Lambda Function Associations was. I selected Origin Response and then pasted in that ARN. Don’t forget to put in a colon and the version number (ie :1).
I saved my config by pressing Yes, Edit. And then waited for the Lamdba function to woosh around the CloudFront CDN (ie: 10-20 minutes).
Test the website
This is kind of the reason why I created a separate CloudFront distribution as you will see from the result below. My website was totally broken. So just using the boilerplate code for the security headers won’t get you there, YMMV depending on the complexity of your site and where scripts are getting pulled from etc.

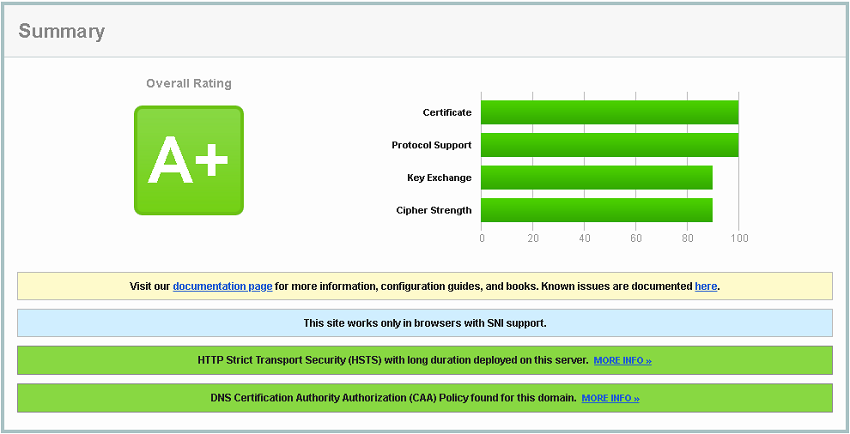
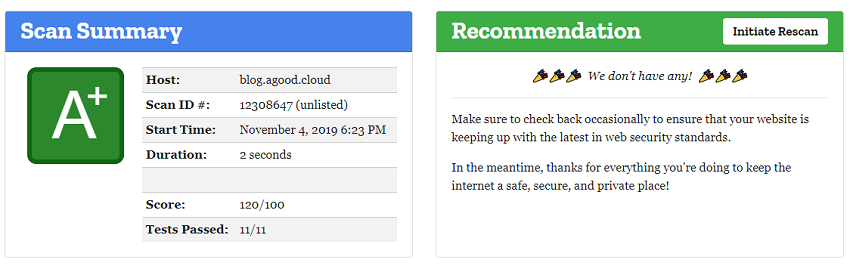
By the way, at this point my site now rates as an A+ on Qualys, even though its busted right up.
So to start addressing the issues I was facing, I used the F12 developer options to find out why each error was occurring. The high level steps were as follows:
- Find the error from the
F12,Networktab. - Go to Lambda and change to the
$LATESTversion of the function - Updated the appropriate content-security-policy entry in the Lambda function
- Re-save the updated function
- Republish it the function to increment the version number
- Update the
CloudFront methodwith the new Lambda Function number - Wait for CloudFront to sync
- Invalidate the CloudFront cache
- Retest and smack head against wall
- Repeat with lots of trial and mostly error until I got it to work (*cough 18 times, but only cause I made a few typo’s and was testing various configurations)
A nice visual tool for checking Content Security Policy is the CSP Validator
Test Mozilla Observatory
That took way longer than I wished it had, and when I tested via Mozilla Observatory, I only got a C rating! I was given a negative 50 score for Sub Resource Integrity meaning my scripts were not protected against malicious intent.
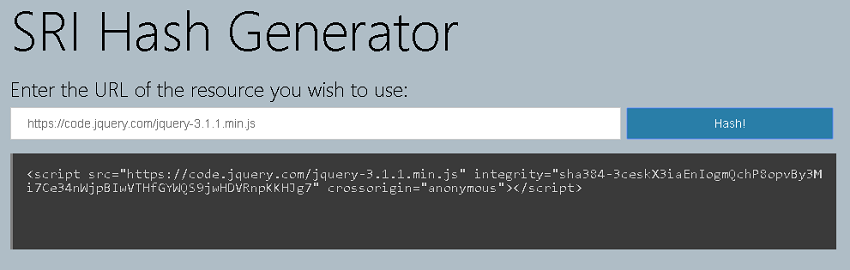
Sub Resource Integrity (SRI)
Thankfully all this meant was a few code changes in my website code to ensure that any <script> blocks had a corresponding hash in the CSP, and with the help of this SRI Hash Generator tool, I was easily able to get required settings to add to my policy.
So, now I have a Qualys A+ and Mozilla A+ rating after much testing. I really do feel pity for anyone who has to do this on any mission critical system. So if you ever get a chance to get to this status before you go live, then spend the time before you do.
At the end, what I thought was going to be a quick win, was not so, but I learnt a lot along the way and eventually achieved my desired result.