By Adrian | December 23, 2022
In my last post about the MITRE attack Navigator I covered how you can create multiple layers and then aggregate them together which is all well and good until you realise, that if you wanted to see that level of detail each time you accessed the Attack Navigator you need to specify that json file. This is where this post comes in.
Its quite a straight forward process to host your own navigator and further customise it to suit your needs.
Pre-requsites
For this you will need a machine/virtual machine with Docker and git installed. I am using a Linux based VM for this.
Clone the MITRE Attack Navigator Repository
From the terminal clone the MITRE Attack Navigator repo
git clone https://github.com/mitre-attack/attack-navigator.git && cd attack-navigator

# Output
Cloning into 'attack-navigator'...
remote: Enumerating objects: 11416, done.
remote: Counting objects: 100% (682/682), done.
remote: Compressing objects: 100% (280/280), done.
remote: Total 11416 (delta 466), reused 527 (delta 388), pack-reused 10734
Receiving objects: 100% (11416/11416), 33.03 MiB | 6.23 MiB/s, done.
Resolving deltas: 100% (8982/8982), done.
Build the Docker Image
At the time of writing the Dockerfile is configured to use Node:16. I found that the Attack Navigator would not build successfully with this. From what I could tell there are some dependancy issues with the packages that needed installing. The Dockerfile has --legacy-peer-deps for the package installer, however I found that this still produced show stopping errors and the build never completed.

To get around this I updated the Dockerfile to use Node:14 instead. Hopefully this can be fixed in a later release. The build process didnt take too long to complete. The longest part is step 8
docker build -t atk-nav .

# Output
Step 1/11 : FROM node:14
 ---> 0f2c7f307e4d
Step 2/11 : WORKDIR /src
 ---> Running in 03ac0a172ef7
Removing intermediate container 03ac0a172ef7
 ---> 5cab91705d9e
Step 3/11 : COPY nav-app/ /src/nav-app/
 ---> 2f711604254f
Step 4/11 : COPY layers/*.md /src/layers/
 ---> 689796c19963
Step 5/11 : COPY *.md /src/
 ---> 010d5c51fa7e
Step 6/11 : WORKDIR /src/nav-app
 ---> Running in 6eb27e098cde
Removing intermediate container 6eb27e098cde
 ---> 46dd32a4b8ab
Step 7/11 : RUN chown -R node:node ./
 ---> Running in 2324ecea5e70
Removing intermediate container 2324ecea5e70
 ---> 049d02552451
Step 8/11 : RUN npm install --unsafe-perm --legacy-peer-deps
 ---> Running in fc3034c749ef
...
<npm output snipped>
...
Removing intermediate container fc3034c749ef
 ---> 7a4146520fef
Step 9/11 : EXPOSE 4200
 ---> Running in a8293f91214e
Removing intermediate container a8293f91214e
 ---> bc5fa4240d15
Step 10/11 : CMD npm start
 ---> Running in 548e84923641
Removing intermediate container 548e84923641
 ---> ffee311253e4
Step 11/11 : USER node
 ---> Running in 2ad1c0ed2898
Removing intermediate container 2ad1c0ed2898
 ---> 11eafdb80f8e
Successfully built 11eafdb80f8e
Successfully tagged atk-nav:latest
Download the Attack Navigator Content
So that we dont have to slow things down when we access the navigator, we need to download the Attack Navigator json files locally.
cd nav-app/src/assets
wget https://raw.githubusercontent.com/mitre/cti/master/enterprise-attack/enterprise-attack.json
wget https://raw.githubusercontent.com/mitre/cti/master/mobile-attack/mobile-attack.json
wget https://raw.githubusercontent.com/mitre/cti/master/pre-attack/pre-attack.json
The 3 files we have downloaded are the ATT&CK v12 content files. You could get creative and download all the other older json files from v4 - v11 as well but you would need to create a structure so that you could reference them in the config correctly.
Update the config.json file
Using your favorite text editor edit the config.json file. We need to update the section for ATT&CK v12. It looks like this before changes have been made:
{
            "name": "ATT&CK v12",
            "version": "12",
            "domains": [
                {
                    "name": "Enterprise",
                    "identifier": "enterprise-attack",
                    "data": ["https://raw.githubusercontent.com/mitre/cti/ATT%26CK-v12.1/enterprise-attack/enterprise-attack.json"]
                },
                {
                    "name": "Mobile",
                    "identifier": "mobile-attack",
                    "data": ["https://raw.githubusercontent.com/mitre/cti/ATT%26CK-v12.1/mobile-attack/mobile-attack.json"]
                },
                {
                    "name": "ICS",
                    "identifier": "ics-attack",
                    "data": ["https://raw.githubusercontent.com/mitre/cti/ATT%26CK-v12.1/ics-attack/ics-attack.json"]
                }
            ]
        },
Change it so it references the json files locally. Update the "data" value like this:
        {
            "name": "ATT&CK v12",
            "version": "12",
            "domains": [
                {
                    "name": "Enterprise",
                    "identifier": "enterprise-attack",
                    "data": ["assets/enterprise-attack.json"]
                },
                {
                    "name": "Mobile",
                    "identifier": "mobile-attack",
                    "data": ["assets/mobile-attack.json"]
                },
                {
                    "name": "ICS",
                    "identifier": "ics-attack",
                    "data": ["assets/ics-attack.json"]
                }
            ]
        },
Apply a custom matrix to load
If you saved out your consolidated_view.json matrix from the previous post you also save this into the /nav-app/src/assets folder. If you didn’t its fine any matrix json file will do.
Update the config.json file. Towards the bottom theres a section labelled default_layers. It is not enabled by default, and contains 2 examples.
It should look like this before:
    "default_layers": {
        "enabled": false,
        "urls": ["assets/example.json", "https://raw.githubusercontent.com/mitre-attack/attack-navigator/master/layers/data/samples/Bear_APT.json"]
    },
Update it accordingly. The urls are a comma seperated list.
    "default_layers": {
        "enabled": true,
        "urls": ["assets/consolidated_view.json"]
    },
Start the Docker container
Navigate back to attack-navigator path and run the following command
docker run -d --name attack-navigator -p 4200:4200 -v $(pwd)/nav-app/src/assets/:/src/nav-app/src/assets/ atk-nav
Here we are telling docker to run as a daemon (-d), with the name of attack-navigator (--name), exposing port 4200 (-p) and presenting the nav-app/src/assets/ folder on the Linux host as /src/nav-app/src/assets in the container. This will allow us to modify our matrix and config on the fly.
Test that the Navigator is working
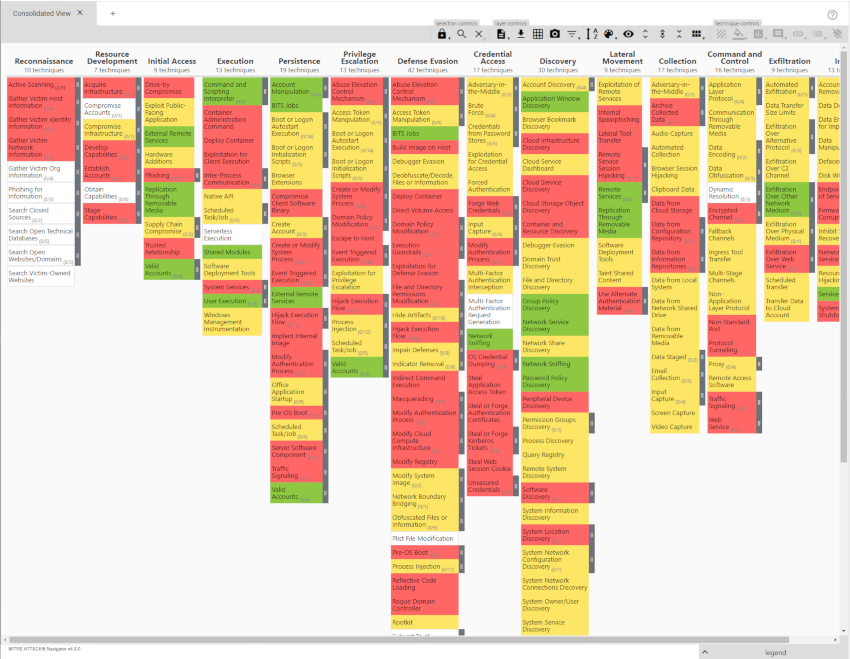
Navigate to the webserver on port 4200. Notice how the consolidated_view matrix is automatically loaded.
Update to remove all controls
The Attack Navigator has some flexibility in what controls are available to the user. Say you wanted to add your consolidated_view to a management dashboard, or give the URL to your CISO. Its just a matter of tweaking the features of the config.json file.
For example, my config file i’ve disabled all features except the ability to download to Excel and view the technique/tactic links.
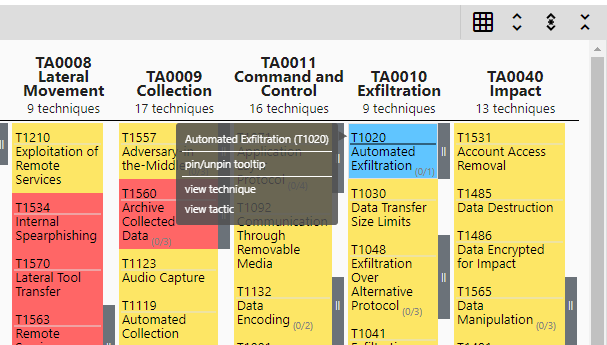
And thats it. No more having to select a custom .json files to the web anymore!
EDIT: The wonderful folks on the ATT&CK project have advised me that the Navigator runs entirely in the browser and any action taken never leaves your computer. The hosted Navigator is just static pages out of github. So its no more having to select a json file to process instead!