By Adrian | January 15, 2023
So Kubernetes is something I’ve been meaning to play with for a while now, but I didn’t really have a good enough use case to really try it out. Docker was doing what I needed it to do without the complexity of Kubernetes so I was all good. I tried getting into Kubernetes a few years ago, watched plenty of videos but it all kind of fell by the wayside, and was eventually forgotten about.
That was until the recent SEC504 course I attended where Josh made a passing comment that he once had a chain of 9 redirections using netcat that started to get a bit funky to remember all the connections and redirects etc for an engagement he was on at the time.
Well this was challenge accepted. Kubernetes would allow me to setup an isolated lab using minikube, where I could learn the intricacies of Kubernetes ingress, service, deployment, pod, network policy and namespaces as well as create a questionablly fun Lab/CTF using netcat in the process. What’s more is that I made it so that it contained 10 steps of required pivoting deep just for the lols. Obviously still doesn’t actually compare to Josh’s real world conundrum.
The Netcat10x as I’m calling it, could have been made more difficult for sure, but my objective was to learn and drum in how netcat pivoting and redirection works and to build up some skills using Kubernetes in the process. I think I acheived this. I have open sourced all the code I used on Github. Please feel free to fork it and adapt it as you see fit. It could prove useful as boilerplate code for a range of other self hosted CTF’s.
The setup
I wanted to have this environment isolated, so I created an Ubuntu Desktop 20.04 as my host OS. I had set this up as a VM on my ProxMox lab environment, but you could also set this up on a physical machine. The specs were:
- 14Gb RAM
- 8 vCPU’s
- 60Gb HDD
Update the Operating System
Did the normal kind of stuff you would do with any new host
sudo apt-get update && sudo apt-get upgrade -y && sudo reboot
Install Minikube
Install minikube with the following commands:
sudo apt install -y curl wget apt-transport-https
wget https://storage.googleapis.com/minikube/releases/latest/minikube-linux-amd64
sudo cp minikube-linux-amd64 /usr/local/bin/minikube
sudo chmod +x /usr/local/bin/minikube
Checked the version afterwards
minikube version

# Output
minikube version: v1.28.0
commit: 986b1ebd987211ed16f8cc10aed7d2c42fc8392f
Install Kubectl
Install kubectl with the following commands:
curl -LO https://storage.googleapis.com/kubernetes-release/release/`curl -s https://storage.googleapis.com/kubernetes-release/release/stable.txt`/bin/linux/amd64/kubectl
chmod +x kubectl
sudo mv kubectl /usr/local/bin/
Checked the version afterwards
kubectl version -o yaml

# Output
clientVersion:
  buildDate: "2022-12-08T19:58:30Z"
  compiler: gc
  gitCommit: b46a3f887ca979b1a5d14fd39cb1af43e7e5d12d
  gitTreeState: clean
  gitVersion: v1.26.0
  goVersion: go1.19.4
  major: "1"
  minor: "26"
  platform: linux/amd64
kustomizeVersion: v4.5.7

The connection to the server localhost:8080 was refused - did you specify the right host or port?
Install Prerequsite: Docker
Installed Docker with the following commands:
sudo apt install -y ca-certificates curl gnupg lsb-release
curl -fsSL https://download.docker.com/linux/ubuntu/gpg | sudo gpg --dearmor -o /usr/share/keyrings/docker-archive-keyring.gpg
echo "deb [arch=$(dpkg --print-architecture) signed-by=/usr/share/keyrings/docker-archive-keyring.gpg] https://download.docker.com/linux/ubuntu $(lsb_release -cs) stable" | sudo tee /etc/apt/sources.list.d/docker.list > /dev/null
sudo apt-get update
Add the current user to the Docker group
sudo apt install docker-ce docker-ce-cli containerd.io -y
sudo usermod -aG docker $USER
newgrp docker
At this stage, logout and back in again before verifying the docker installation with the following command:
docker version

# Output
Client: Docker Engine - Community
 Version:           20.10.22
 API version:       1.41
 Go version:        go1.18.9
 Git commit:        3a2c30b
 Built:             Thu Dec 15 22:28:08 2022
 OS/Arch:           linux/amd64
 Context:           default
 Experimental:      true

Server: Docker Engine - Community
 Engine:
  Version:          20.10.22
  API version:      1.41 (minimum version 1.12)
  Go version:       go1.18.9
  Git commit:       42c8b31
  Built:            Thu Dec 15 22:25:58 2022
  OS/Arch:          linux/amd64
  Experimental:     false
 containerd:
  Version:          1.6.15
  GitCommit:        5b842e528e99d4d4c1686467debf2bd4b88ecd86
 runc:
  Version:          1.1.4
  GitCommit:        v1.1.4-0-g5fd4c4d
 docker-init:
  Version:          0.19.0
  GitCommit:        de40ad0
Create a minikube environment
For this minikube setup we need to be using a custom Container Network Interface (CNI) so that we can apply our own network policy rules.
minikube start --addons=metrics-server --cpus=4 --memory=6g --network-plugin=cni --install-addons=true

# Output
😄  minikube v1.28.0 on Ubuntu 20.04 (kvm/amd64)
✨  Automatically selected the docker driver
❗  With --network-plugin=cni, you will need to provide your own CNI. See --cni flag as a user-friendly alternative
📌  Using Docker driver with root privileges
👍  Starting control plane node minikube in cluster minikube
🚜  Pulling base image ...
🔥  Creating docker container (CPUs=4, Memory=6144MB) ...
🐳  Preparing Kubernetes v1.25.3 on Docker 20.10.20 ...
    ▪ Generating certificates and keys ...
    ▪ Booting up control plane ...
    ▪ Configuring RBAC rules ...
🔎  Verifying Kubernetes components...
    ▪ Using image k8s.gcr.io/metrics-server/metrics-server:v0.6.1
    ▪ Using image gcr.io/k8s-minikube/storage-provisioner:v5
🌟  Enabled addons: storage-provisioner, default-storageclass, metrics-server
🏄  Done! kubectl is now configured to use "minikube" cluster and "default" namespace by default
Setup CNI - Calico
I went with Calico for the CNI as it would allow me to create the required network rules. The Calico manifest installation notes can be found here.
Calico was installed with the following commands:
kubectl apply -f https://raw.githubusercontent.com/projectcalico/calico/v3.24.5/manifests/calico.yaml

# Output
poddisruptionbudget.policy/calico-kube-controllers created
serviceaccount/calico-kube-controllers created
serviceaccount/calico-node created
configmap/calico-config created
customresourcedefinition.apiextensions.k8s.io/bgpconfigurations.crd.projectcalico.org created
customresourcedefinition.apiextensions.k8s.io/bgppeers.crd.projectcalico.org created
customresourcedefinition.apiextensions.k8s.io/blockaffinities.crd.projectcalico.org created
customresourcedefinition.apiextensions.k8s.io/caliconodestatuses.crd.projectcalico.org created
customresourcedefinition.apiextensions.k8s.io/clusterinformations.crd.projectcalico.org created
customresourcedefinition.apiextensions.k8s.io/felixconfigurations.crd.projectcalico.org created
customresourcedefinition.apiextensions.k8s.io/globalnetworkpolicies.crd.projectcalico.org created
customresourcedefinition.apiextensions.k8s.io/globalnetworksets.crd.projectcalico.org created
customresourcedefinition.apiextensions.k8s.io/hostendpoints.crd.projectcalico.org created
customresourcedefinition.apiextensions.k8s.io/ipamblocks.crd.projectcalico.org created
customresourcedefinition.apiextensions.k8s.io/ipamconfigs.crd.projectcalico.org created
customresourcedefinition.apiextensions.k8s.io/ipamhandles.crd.projectcalico.org created
customresourcedefinition.apiextensions.k8s.io/ippools.crd.projectcalico.org created
customresourcedefinition.apiextensions.k8s.io/ipreservations.crd.projectcalico.org created
customresourcedefinition.apiextensions.k8s.io/kubecontrollersconfigurations.crd.projectcalico.org created
customresourcedefinition.apiextensions.k8s.io/networkpolicies.crd.projectcalico.org created
customresourcedefinition.apiextensions.k8s.io/networksets.crd.projectcalico.org created
clusterrole.rbac.authorization.k8s.io/calico-kube-controllers created
clusterrole.rbac.authorization.k8s.io/calico-node created
clusterrolebinding.rbac.authorization.k8s.io/calico-kube-controllers created
clusterrolebinding.rbac.authorization.k8s.io/calico-node created
daemonset.apps/calico-node created
deployment.apps/calico-kube-controllers created
Verify the calico-node is running. You can use CTRL+C to exit out of the watch command
watch kubectl get pods -l k8s-app=calico-node -A
Setup Calico Tools
Whilst these will may not actually be needed (we use the K8S network policy Vs the more in depth Calico network policies), they were installed with the following commands:
For calicoctl
curl -L https://github.com/projectcalico/calico/releases/download/v3.24.5/calicoctl-linux-amd64 -o calicoctl
chmod +x calicoctl
sudo mv ./calicoctl /usr/local/bin
For kubectl-calico
curl -L https://github.com/projectcalico/calico/releases/download/v3.24.5/calicoctl-linux-amd64 -o kubectl-calico
chmod +x kubectl-calico
sudo mv ./kubectl-calico /usr/local/bin
Enable the Minikube Ingress addon
As everything is contained inside of Minikube we need a way to access the pods inside from our Ubuntu Desktop. This is done via the ingress addon.
The addon is enabled with the following command:
minikube addons enable ingress

# Output
💡  ingress is an addon maintained by Kubernetes. For any concerns contact minikube on GitHub.
You can view the list of minikube maintainers at: https://github.com/kubernetes/minikube/blob/master/OWNERS
    ▪ Using image k8s.gcr.io/ingress-nginx/kube-webhook-certgen:v1.1.1
    ▪ Using image k8s.gcr.io/ingress-nginx/controller:v1.2.1
    ▪ Using image k8s.gcr.io/ingress-nginx/kube-webhook-certgen:v1.1.1
🔎  Verifying ingress addon...
🌟  The 'ingress' addon is enabled
System checks
There are a few pre-reqs to install to get this up and running. I confirmed that Minikube was good to go with the following command:
minikube status

# Output
minikube
type: Control Plane
host: Running
kubelet: Running
apiserver: Running
kubeconfig: Configured
NetCat Lab Setup
If you clone the github repository you can run the ./setup.sh file which will apply all the required configuration. The longer and more detailed explaination goes as follows.
Namespace
So that we can keep everything in a nicely contained namespace within Kubernetes (instead of just throwing it all into the default namespace), a netcatlab namespace is created with the following yaml.
apiVersion: v1
kind: Namespace
metadata:
  name: netcatlab
  labels:
    name: netcatlab
Theres really not much to this, were just creating a namespace. In our other configuration files we need to reference namespace: netcatlab.
Ingress
This is the configuration for how you access a FQDN from the Ubuntu Desktop into the pods being hosted in Minikube. Keep in mind that you will also need to update your DNS (cough or /etc/hosts file) with whatever you set the hostnames to be. The setup script uses sed to replace var.ingress_host with your chosen FQDN.
The following is a sample of the file, as it contains multiple hosts (one for each stage). Note the namespace is set and we are allowing port 8080 which is what GoTTY (a web based terminal) listens on.
apiVersion: networking.k8s.io/v1
kind: Ingress
metadata:
  name: terminal-ingress
  labels:
    app: ingress
  namespace: netcatlab
spec:
  rules:
  - host: terminal.var.ingress_host
    http:
      paths:
      - path: /
        pathType: Prefix
        backend:
          service:
            name: terminal
            port:
              number: 8080
Secrets
Yes, I know, storing secrets in files and then hosting them on Github isnt the thing to do. However this is a Lab thats not connected to anything and the secrets are really just a quick and dirty way of hiding the flags as you progress though each stage. In fact, ive even included the plain text secrets as comments. You could reverse engineer the entire lab, but then you defeat the purpose. Besides, if you are setting it up for someone else, they wont be able to see the secrets file ;-)
I basically use 3 secrets/variables for each stage. Kubernetes requires that secrets are base64 encoded.
- stageXgotty is the username and password that is used to unlock the webterminal (so you cant just unlock all the levels instantly)
- stageXcurl is a string that tells you what you need to
POSTto the webserver in order to get the GoTTY username/password - stageXUnlock is a confirmation that is used to ensure the
POSTrequest to the webserver is the right flag
Once again, this is just a snippet, as there are multiple stages.
apiVersion: v1
kind: Secret
metadata:
  name: netcatlab-secrets
  namespace: netcatlab
type: Opaque
data:
  # snip
  stage0gotty: ZmxhZzplbnRyeXBvaW50 # flag:entrypoint
  stage0curl: VGhlIGZsYWcgdG8gc3VibWl0IHRvIGh0dHA6Ly9zdGFnZTE6NTAwMCBpcyAnUG9ydFNjYW5uaW5nJwo= # The flag to submit to http://stage1:5000 is 'PortScanning'
  stage0Unlock: UG9ydFNjYW5uaW5n # PortScanning
  # snip
The Webterminal Docker Image
The lab uses a single image file that contains everything it needs namely, gotty, python, curl, flask as well as the following 2 custom scripts:
app.py- creates a Flask listener on port 5000 as well as checks if the correct unlock password is given for the next webterminal.start.sh- reads theFLAGTXTvariable that is configured in the Kubernetes deployment file and writes it toflag.txt. It starts GoTTY on port 8080 (which is made available by FQDN by ingress), and finally starts the Flask web server.
The container runs start.sh as its starting command.
I’m sure that more could be done to further harden the Dockerfile/image to avoid any potential bypasses.
Upload the Image into Minikube
After the Docker image file has been created, you need to upload this into Minikube so that it can be referenced. The following command does this:
minikube image load webterminal
If you need to update the image, remove it from minikube first with the following command:
minikube image rm webterminal
You can check what images have been uploaded into minikube using:
minikube image ls | grep webterminal
Network policy
Of the entire setup, this was probably the most annoying part to figure out. For a long time I was attempting to apply a network policy when I didnt have a CNI configured which meant no policy configuration would actually apply. Its what lead me down the Calico rabbit hole, and ultimatley with a bunch of Network Policies.
You see I wanted to ensure that you couldnt cheat by starting on the first pod, bypassing all the other pods in between and connect to the last pod to collect the final flag. Well technically you can just get the last flag from stage8, but the network policies prevent the former scenario.
The way that this is achevied is to allow the current stage to only access the prior stage and the next stage via ports 5000 (for Flask) and 2222 (so that you can setup a netcat pivot on it). All other ports are then blocked and no other pod can contact it unless its in the current Network Policy.
Allow stage1 to access stage0 both ways on port 5000 and 2222.
apiVersion: networking.k8s.io/v1
kind: NetworkPolicy
metadata:
  name: stage1-allow-to-stage0
  namespace: netcatlab
  annotations:
    note: "stage1 <-> stage0"
spec:
  podSelector:
    matchLabels:
      app: stage1
  policyTypes:
  - Ingress
  - Egress
  ingress:
  - from:
    - podSelector:
        matchLabels:
          app: stage0
    ports:
    - protocol: TCP
      port: 2222
    - protocol: TCP
      port: 5000
  egress:
  - to:
    - podSelector:
        matchLabels:
          app: stage0
    ports:
    - protocol: TCP
      port: 2222
    - protocol: TCP
      port: 5000
Allow stage1 to access stage2 both ways on port 5000 and 2222.
apiVersion: networking.k8s.io/v1
kind: NetworkPolicy
metadata:
  name: stage1-allow-to-stage2
  namespace: netcatlab
  annotations:
    note: "stage1 <-> stage2"
spec:
  podSelector:
    matchLabels:
      app: stage1
  policyTypes:
  - Ingress
  - Egress
  ingress:
  - from:
    - podSelector:
        matchLabels:
          app: stage2
    ports:
    - protocol: TCP
      port: 2222
    - protocol: TCP
      port: 5000
  egress:
  - to:
    - podSelector:
        matchLabels:
          app: stage2
    ports:
    - protocol: TCP
      port: 2222
    - protocol: TCP
      port: 5000
This pattern is basically repeated for each stage, and the 2 configurations are put into the same file.
There is one other network policy that will allow the GoTTY terminal to be accessed from any IP (so you can use the Ubuntu Desktop to access it) as well as allow DNS so you can hit each stage with a friendly name as opposed to a dynamic IP thats assigned at the time the pod is created.
Deployment and Service
The final part to all of this is creating the pods themselves via a Deployment. The deployment config references the secrets file for its variables. This was so I did not have to worry about creating any volumes and attaching them. It references the netcatlab namespace as well as our webterminal image file.
The Service file is what links ingress back to the pod. For example, when stage0.the.fqdn.com is accessed it looks at the service in the ingress and then sends the traffic to that service on the required port number.
As the Service definition is linked to the Deployment they are incldued in the same file.
These files are in the github repo.
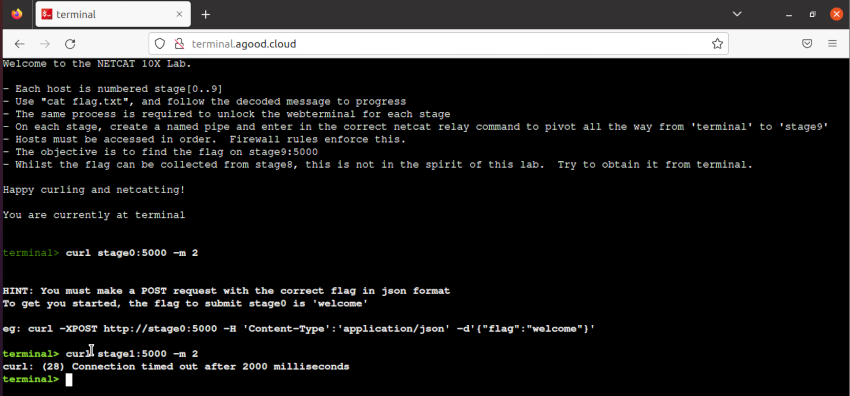
So what does it look like
To start the Lab, open http://terminal.yourfqdn.com. Notice I can curl to stage0:5000 but not stage1:5000. This forces you to access the next stage from only the previous stage.
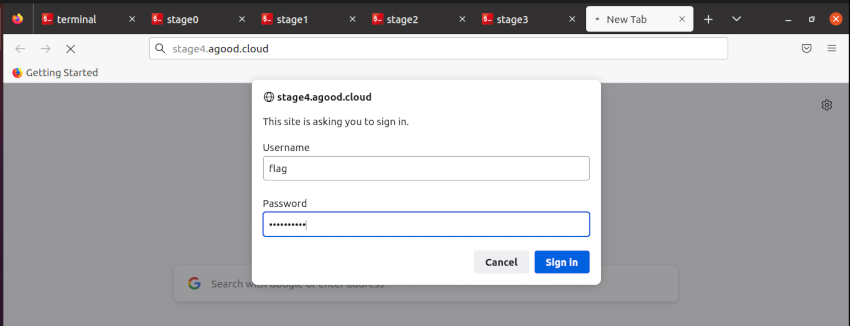
As you progress you have a collection of tabs opened. Eventually you will get to stage9 where you can then start to create netcat pivot after pivot.
Wrap-up
At the end of the day, I got what I wanted to achieve learning a lot more about Kubernetes, YAML config, Dockerfile and Flask, as well as Bash scripting, Netcat and pivoting by completing the lab I had built up. A Walkthru post will follow at some stage in the future. Is it as locked down as possible, probably not.
Reference commands
Here is a reference of all the commands that I used witin Kubernetes and Docker
| Command | Description |
|---|---|
| kubectl apply -f [file].yaml | Applies a config |
| kubectl delete -f [file].yaml | Deletes a config |
| echo -n “somestring” | base64 | Converts a string to base64 for the secrets file |
| echo -n “someB64” | base64 -d | Decodes a Base64 string back to a string |
| docker build . -t webterminal | Build the webterminal image file |
| minikube image load webterminal | Upload the webterminal image file to minikube |
| minikube image rm webterminal | Delete the webterminal image file from minikube |
| kubectl get pod -A | List out all pods in all namespaces |
| kubectl describe pod -n netcatlab [podname] | Get more information about a specific pod |
| kubectl exec -it -n netcatlab [podname] – /bin/bash | Access an interactive bash terminial of a pod |