By Adrian | November 12, 2019
“You need to add reCaptcha to your webforms” - Its advice I’ve given out to security teams each time I see a malicious link or some spam pusher in the resulting email. Its the poor user who cops the brunt of them, increasing the chance of a click, increasing that chance of compromise. Reading through formspam is just a waste of time for everyone. I recall an instance where an internal securiy team miscofigured a tool they were using, set it to run overnight and that mailbox ended up with 35k+ emails in it. To top it off, it was delivered to a Lotus Notes mailbox which just caused that system to hang due to the sheer volume of email. Not a fun exercise for that person to go through.
So, in the interests of practicing what I preach, I decided to do just that myself. But I had to make it harder on myself for a number of reasons. The main ones being, I am not a web developer, NodeJS, HTML/CSS isn’t my thing, this solution needs be completed via serverless means and any snippets of code, or any shred of a walkthrough just didn’t want to behave for me. So lots of trial and error testing and eventually I was able to cobble together a solution. I know its not perfect, but it seems to be working just fine. If my implementation is wrong, please feel free to contact me!.
Theres a few parts to get this solution working.
Inital configuration
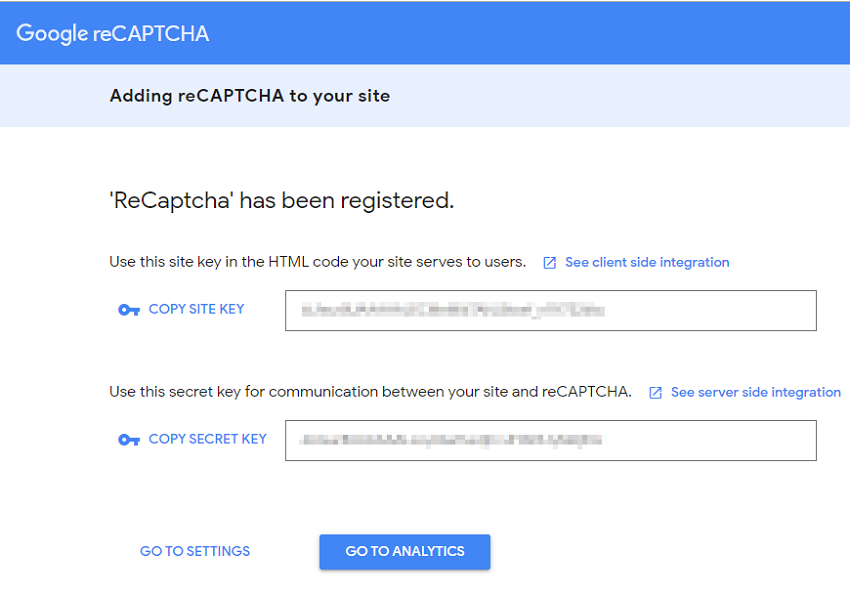
First of all I needed to get a set of keys from Google reCaptcha. I opted for v2 I am not a Robot checkbox.
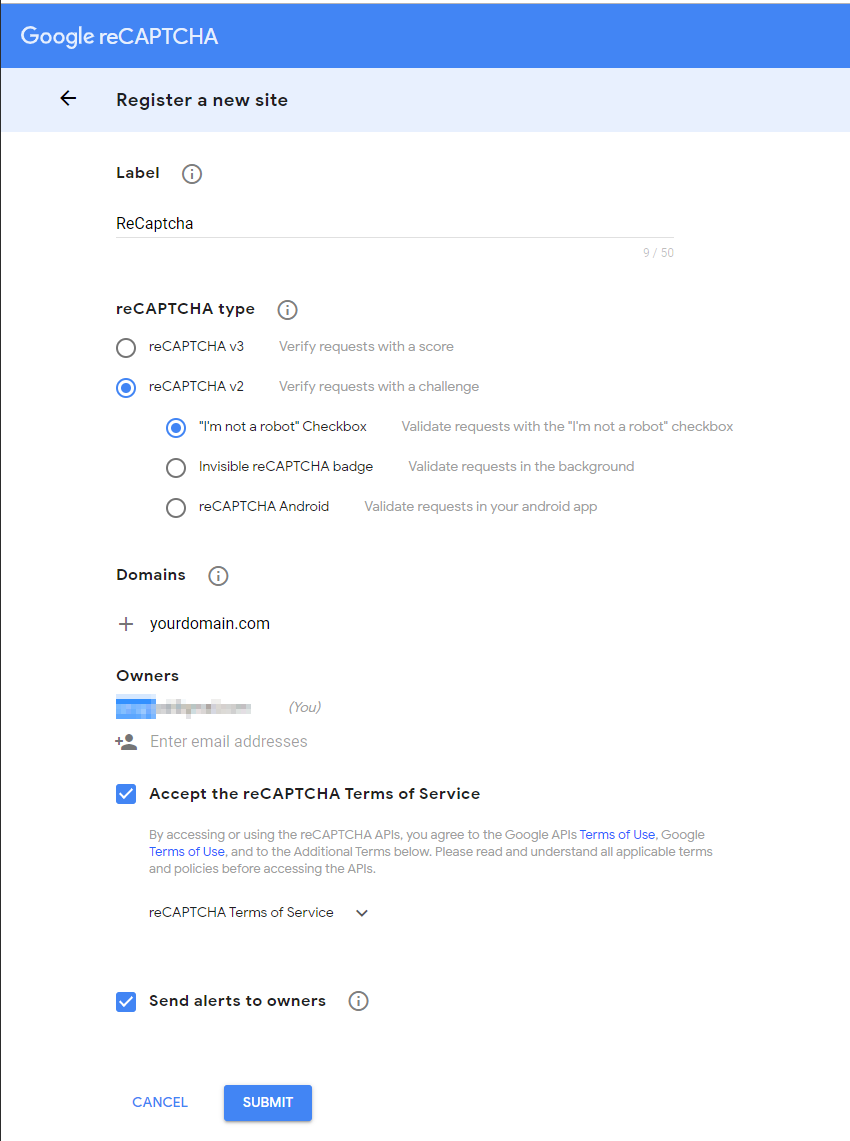
The output gave me the site key (client) and secret key (server)
Server Side Config
As my blog is running serverless (that is to say a static website on S3) there is no server for me to run the backend validation against. This is where SNS, Lambda, API gateway and IAM come into the picture.
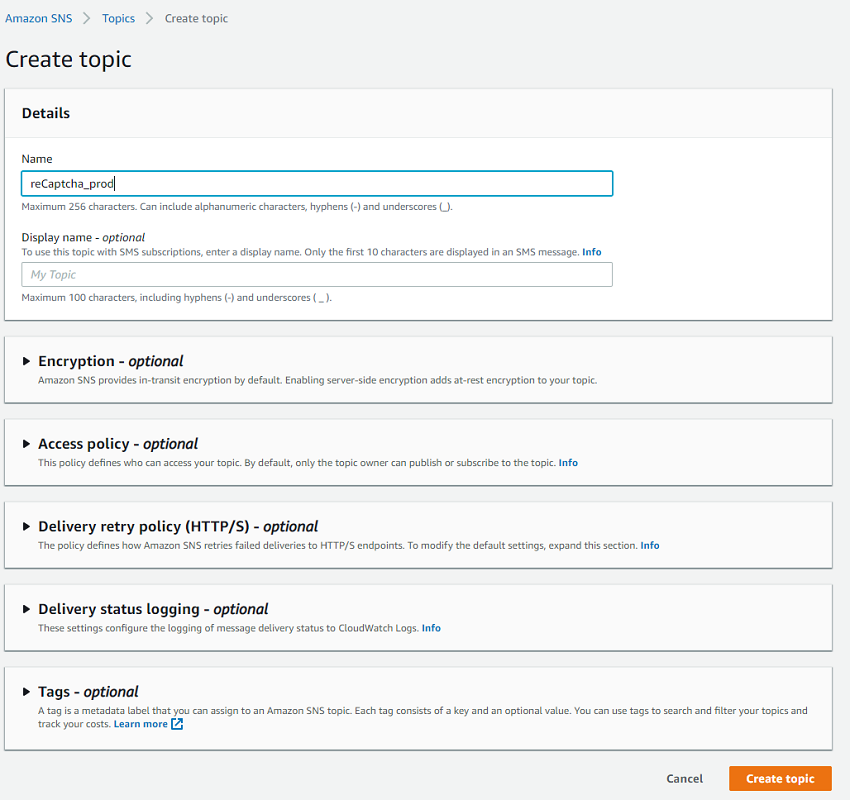
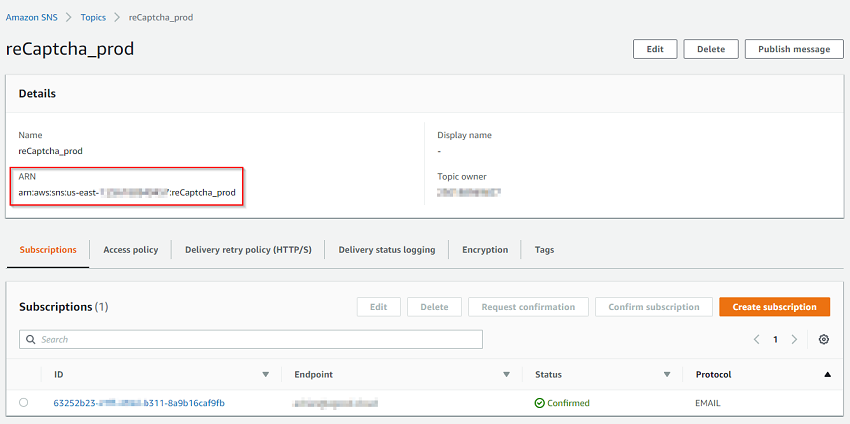
Create a SNS Topic
In the Simple Notification Service console, I created a new topic called reCaptcha_prod.
After I setup the topic, I created a subscription for myself
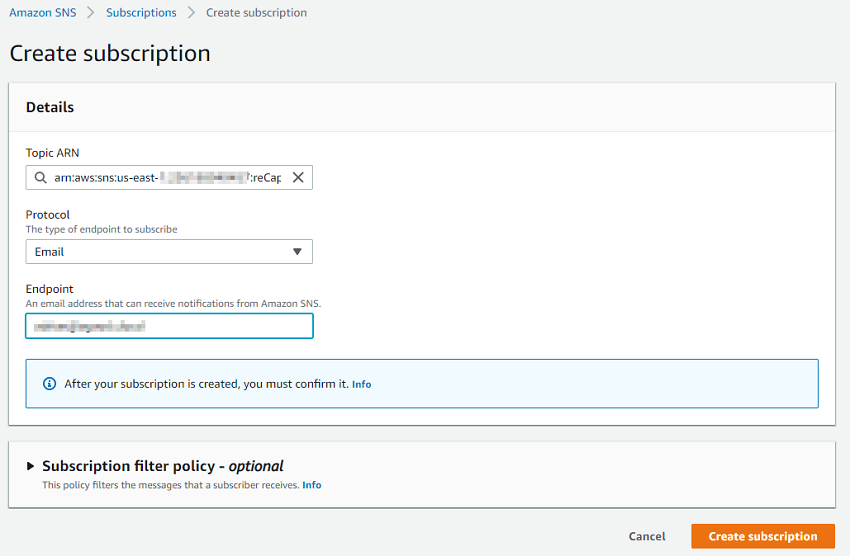
And confirmed that subscription when the email arrived

For the final part of the SNS setup, I copied the ARN. This is needed in the server side Lamdba function.
Function dependencies
Because I needed to build a NodeJS project with the axiom package for this to operate I needed to add a package.json file
{
  "name": "myProject",
  "version": "0.0.1",
  "private": true,
  "scripts": {},
  "dependencies": {
    "aws-sdk": "^2.229.1",
    "axios": "^0.18.0"
  }
}
Next I had to run an npm install to get all the required packages. In retrospect I’m thinking there has to be an easier way to perform a POST request without requiring axiom. Maybe its just me, and I really don’t want to try and figure that out at this time.
Code for the function
With all the packages downloaded, I added the following index.js file to the project directory. On the client side, when the Submit button is pressed, it makes a call out to API gateway, which then runs the code from Lambda. Substitute the reCaptchaSecren and snsTopic variables with your own values.
This code basically performs the following:
- back end validation with reCaptcha
- logging to cloudwatch
- creates an SNS topic which in turn sends the email out.
index.js
'use strict';
const AWS = require("aws-sdk");
AWS.config.update({region: 'us-east-1'});

const axios = require('axios');
const reCapUrl = "https://www.google.com/recaptcha/api/siteverify";

// This is the reCaptcha secret key
const reCaptchaSecret = "<YOUR RECAPTCHA SECRET HERE>";

// This is the SNS Topic configured so you can be emailed.
const snsTopic = "<YOUR SNS TOPIC IN HERE>";

module.exports.webhook = async (event, context, callback) => {
  console.log("Starting ContactForm Processing for website form.");
  console.log(event)

  let body = event.body;
  let headers = event.headers;

  // process the urlencoded body of the form submit and put it in a map structure
  let parts = body.split('&');
  let result = [];

  // grab the params
  for (let i = 0, len = parts.length; i < len; i++) {
     let kVal = parts[i].split('=');
     // replace the + space then decode
     let key = decodeURIComponent(kVal[0].replace(/\+/g, ' '));
     result[key] = decodeURIComponent(kVal[1].replace(/\+/g, ' '));
  }

  // Enable to inspect the params in Amazon Cloudwatch
  // console.log(result);

  // verify the result by POSTing to google backend with secret and
  // frontend recaptcha token as payload
  let verifyResult = await axios ({
    method: 'post',
    url: reCapUrl,
    params: {
        secret: reCaptchaSecret,
        response: result["g-recaptcha-response"]
    },
    headers: {
        "Content-Type": "application/x-www-form-urlencoded",
        "Accept": "*/*"
    }

  });

  // Enable to see the result
  // console.log(verifyResult);

  if (verifyResult.status === 200) {
    // Response was ok - but could still be a failed validation

  if (verifyResult.data["success"] === true) {
    let emailbody = "Contact form sumitted via:" + headers.origin +
    "\n\nFrom:"+result["name"]+
    "\nEmail: "+result["email"]+
    "\nComment: "+result["comment"]+
    "\n\nIP: " +headers["X-Forwarded-For"]+
    "\nUser Agent: " +headers["User-Agent"];

    // Create publish parameters
    var params = {
      Message: emailbody,
      TopicArn: snsTopic
    };

    // Create promise and SNS service object
    var publishTextPromise = new AWS.SNS({apiVersion: '2010-03-31'}).publish(params).promise();

    // Handle promise's fulfilled/rejected states
    publishTextPromise.then(
    function(data) {
      console.log("Message: " + params.Message + " was sent to the topic " + params.TopicArn);
      console.log("MessageID is " + data.MessageId);
      }).catch(
        function(err) {
          console.error(err, err.stack);
        });

      // now we return a HTTP 302 together with a URL to redirect the
      // browser to success URL
      callback(null, {
      statusCode: 302,
      headers: {
        Location: headers.origin,
      }

    });

  }

  } else {
    console.log("reCaptcha check failed. Most likely SPAM.");
  }
};
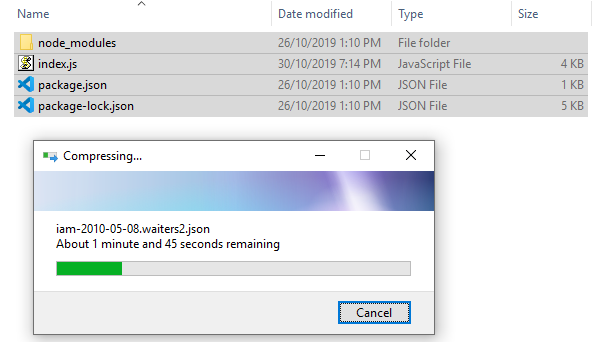
With the dependencies and code all prepared, I needed to zip up the contents to upload into Lambda. This is because the project contains external packages.
Uploading the function
With the ZIP file in hand, I went to the Lambda console and selected Create Function
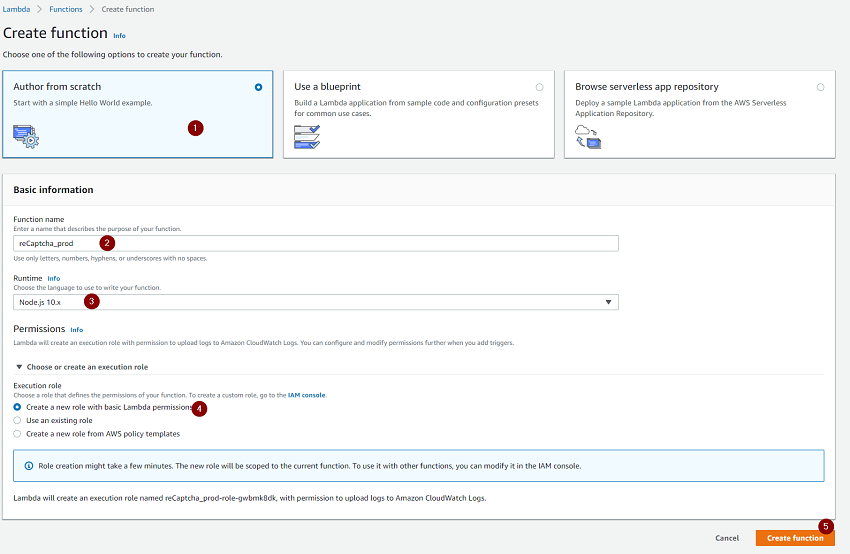
- Select Author from Scratch
- Give the function a name
- Choose
Node.js 10.xas the Runtime - Select
Create a new role with basic Lambda permissions - Select
Create Function
Under Function Code, I changed the Code Entry Type to Upload a .zip file and selected the bundled zip file I created. I also changed the Handler from index.handler to index.webhook to match the function name in the script.

When I pressed Save the zip file was uploaded.
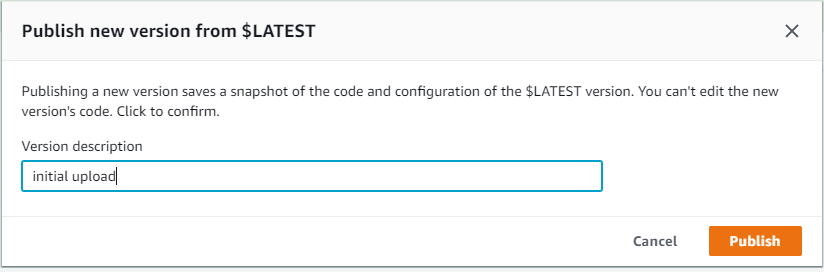
After the function was saved I select Actions -> Publish new version -> Publish.
Add the API Gateway Hook
Now that the function was ready, under the Designer section, I selected + Add Trigger.
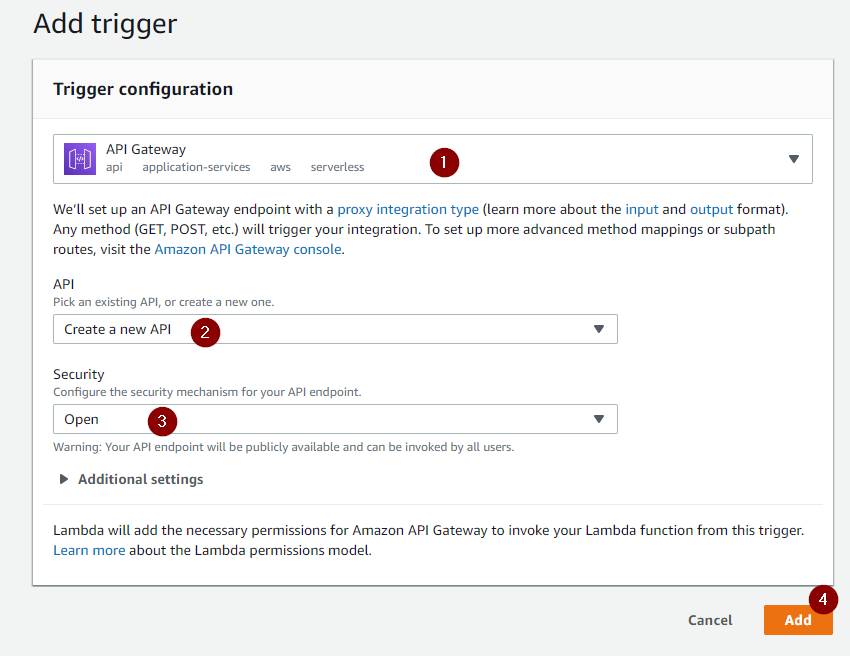
- Select
API Gateway - Select
Create a new API - Select
Open - Press
Add
Back in the Lambda screen I selected API Gateway and made a copy of the API Endpoint URL. This is what went into my client side HTML code.

Update IAM Role to allow the function to publish to SNS
With the function created, I just needed to ensure that it could send results out to SNS, so I opened the IAM console
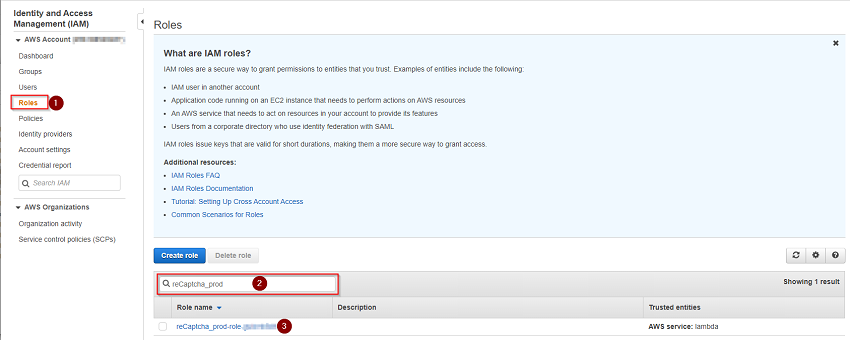
- Select
Roles - Search for
reCaptcha_prod - Select the role
From the Summary, I selected Add Inline policy and completed the following:
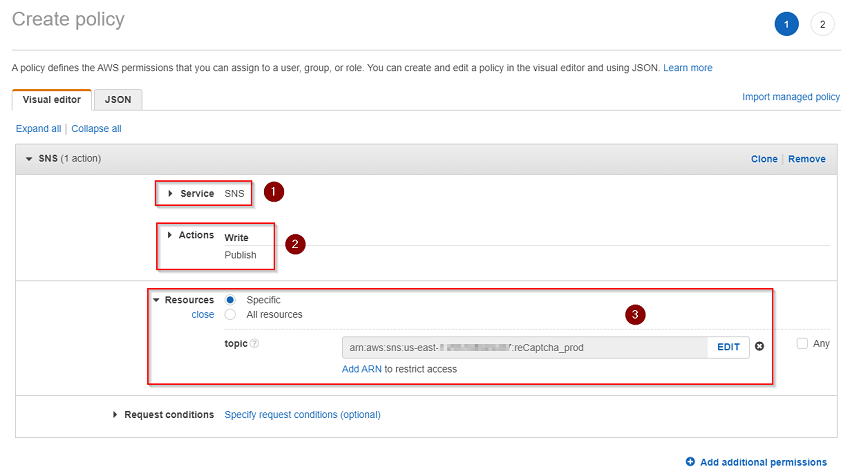
- Selected
SNSfor the service - Selected
Write/Publishfor the actions - Selected the specific
ARNfor mySNStopic
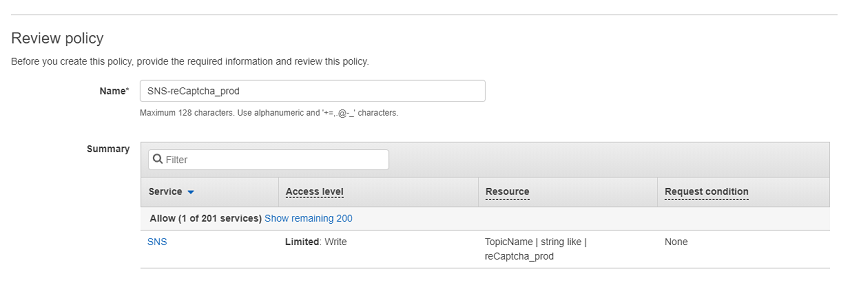
On the review page, I gave the policy a name and pressed Create Policy
Client Side Config
This is basically the HTML/CSS contact.html code that I put on my website. Hugo was happy to accept the HTML file, as long as it has a hugo meta header on it.
You will need your own API Gateway and Google reCaptcha site key for this.
+++
title = "Contact"
id = "contact"
+++

<h1> Want to contact me?</h1>

<h3><strong>I'd love to hear from you!</strong></h3>

<p>Hit me up on <b>Twitter</b>: @agoodcloud_blog or use the form below!<br><br></p>

<!-- Main (Home) section -->
<div id="v-Container">
    <script>
        $(document).ready(function() {

            $("#submit").click(function(e) {
                e.preventDefault();

                var name = $("#name").val(),
                    email = $("#email").val(),
                    comment = $("#comment").val();

                $.ajax({
                    type: "POST",
                    url: '<YOUR AWS API GATEWAY URL IN HERE>',
                    contentType: 'application/json',
                    data: JSON.stringify({
                        'name': name,
                        'email': email,
                        'comment': comment
                    }),
                    success: function(res){
                        $('#contact-submit').text('Email was sent.');
                    },
                    error: function(){
                        $('#contact-submit').text('Error.');
                    }
                });
            })
        });

    </script>

    <script src="https://www.google.com/recaptcha/api.js"></script>
    <div class="container"><form id="contact"  action="<YOUR AWS API GATEWAY URL IN HERE>" method="post" enctype="application/json">
        <p><input id="name" tabindex="1" name="name" required="" type="text" autofocus="" placeholder="Your name" size="40"/></p>
        <p><input tabindex="2" name="email" required="" type="email" placeholder="Email address" size="40" /></p>
        <p><textarea id="comment" name="comment" tabindex="3" required="" placeholder="Type your comment here" rows="4" cols="40"></textarea></p>
        <div class="g-recaptcha" ; data-sitekey="<YOUR GOOGLE RECAPTCHA CLIENT KEY IN HERE>" data-callback="ccb"></div><br>
        <button id="contact-submit" disabled name="submit" type="submit" data-submit="...Sending">Submit</button>
        </form></div>

        <script>
            function ccb(response) {
            document.getElementById("contact-submit").disabled = false;
            }
        </script>

    </div>
Recap to date
This is getting rather long now, but to recap the steps that I’ve taken so far:
- Get Google reCaptcha v2 keys
- Created the SNS topic (Noted the ARN)
- Created a nodeJS project
- Added
package.jsonfile - ran npm install to bundle the dependencies
- Added
index.jsfile - Included reCaptcha secret
- Included SNS topic ARN
- Zipped up the project
- Added
- Created Lambda function with the zip file
- Added API gateway hook
- Updated IAM so that the Lambda function could publish to SNS
- Created the client side code
- Included the API gateway url
With that I will leave this post here and next cover off how I integrated and tested it with my blog.
Before I forget
Credit where credit is due. I could not have done this without these resources as a guide: