By Adrian | August 22, 2020
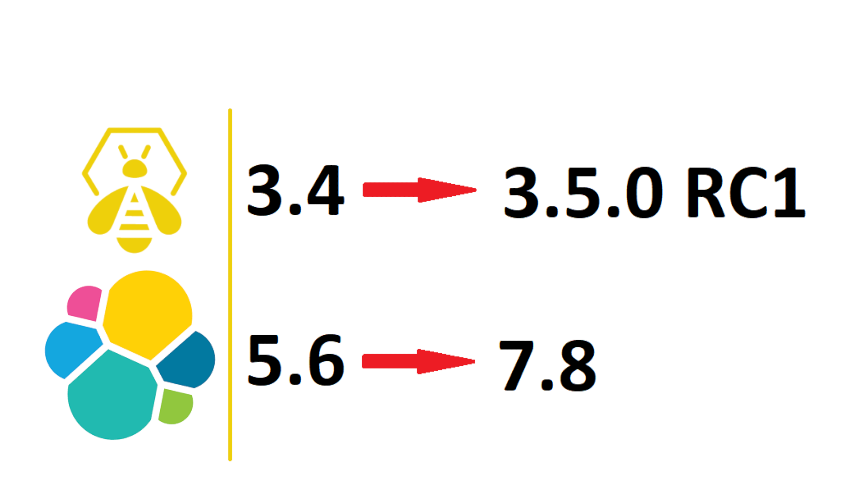
TheHive 3.5.0 RC1 has now been released and my environment is in a bit of a shambles for this upgrade. You see when I performed my upgrade of TheHive 3.2.1 to 3.4.0 I elected to not upgrade to ElasticSearch 6.8 at the time as I wanted to do some more testing on it. I told myself, TheHive 3.4 was working just fine using Elasticsearch 5.6, so I never went ahead with the Elastic part of the upgrade. It was at that point I introduced technical debt into my environment. Were going to fix that up now by performing upgrades to both ElasticSearch and TheHive.
So why go down this path of upgrading TheHive to begin with?
- Elasticsearch supportability: You can run TheHive 3.4.x on Elasticsearch 5.6, but it went EOL in March 2019 with no further maintenance after ES7. That time has now come.
- TheHive 3.5.x will run on the latest ES7 backends that are supported to the end of 2021 and beyond
- New features are being introduced into TheHive all the time and you may consider some of these to be critical or very nice additions to your operation
- Security and Bug fixes: Its been pretty rare, but there have been vulnerabilities in TheHive product in the past THP-SEC-ADV-2017-001. This application is no different to any other one, they require patching.
- You may consider TheHive 4.x to be too bleeding edge but should still be working towards a plan to get there
Table of Contents
- Table of Contents
- Caveats
- Current State to Future State
- Create a backup
- Upgrade ES 5.6 to ES 6.8
- Stop TheHive service
- Disable shard allocation
- Stop ES 5.6 service
- Perform upgrade to ES 6.8
- Upgrade any plugins
- Update ES 6.8 configuration
- Set $JAVA_HOME for ES
- Update the permissions of the
/etc/default/elasticsearchfile - Restart ES 6.8
- Check that ES is running
- Re-enable shard allocation
- Re-Enable TheHive and Start
- Post ES 6.8 Upgrade - Test TheHive
- Perform migration from ES 6.8 to ES 7.8
- Install Prerequisite: JQ
- Identify if your index should be reindexed
- Make a note of the current indices on you Elasticsearch instance
- Stop TheHive service
- Create a new index
- Confirm
new_the_hive_15index has been created - Reindex the data
- Post Reindex Check
- Delete old index
the_hive_15 - Alias
new_the_hive_15tothe_hive_15
- Upgade openjdk8 to openjdk11
- Upgrade to ES 7.8
- Upgrade TheHive to 3.5
- Wrap up
- References
Caveats
RC versions of TheHive are considered beta / pre-releases and are not suitable for production use as there may be unresolved or introduced bugs.
Use this guide at your own risk, and take precaution to look after your data and always test your upgrades on a duplicated instance so that you are familiar with the steps involved. That being said, I documented my steps, ironed out issues I came across and then did this upgrade a second time to test it out.
I am also no Elasticsearch expert, so my settings and steps may or may not be optimal.
This guide assumes that you running only TheHive on a single non-clustered server.
Current State to Future State
Prior to starting anything, be very sure and clear about what components are currently installed. For TheHive, this is as simple as doing an About from the interface. My current environment looks like this:
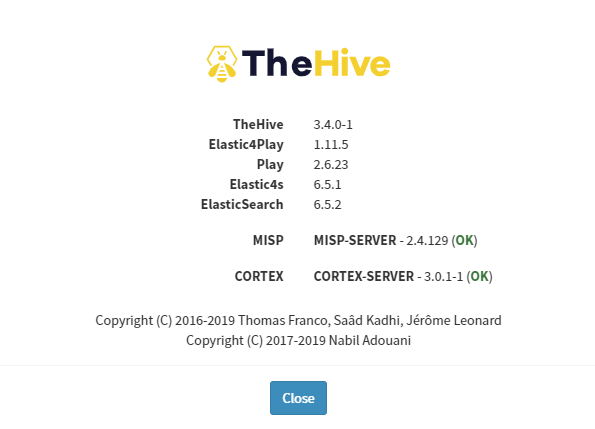
Why Elasticsearch says 6.5.2 on this screen is unknown to me. I assure you I am using ES 5.6.16. Perhaps it denotes the Elasticsearch compatibility for TheHive?
To check your current version of Elasticsearch drop to a shell where your Elasticsearch instance is and execute the following command:
curl  http://localhost:9200

# Output
{
  "name" : "JDfJ33I",
  "cluster_name" : "hive",
  "cluster_uuid" : "QA5Qtex2TjecSbwhz5DcSA",
  "version" : {
    "number" : "5.6.16",
    "build_hash" : "3a740d1",
    "build_date" : "2019-03-13T15:33:36.565Z",
    "build_snapshot" : false,
    "lucene_version" : "6.6.1"
  },
  "tagline" : "You Know, for Search"
}
Create a backup
Now is a great time to perform a backup and snapshot of your server, just in case you need to roll back.
First, create a backup of your Elasticsearch configuration.
sudo su
cd /etc/elasticsearch
cp elasticsearch.yml elasticsearch.yml.backup
My setup already includes the backup folder location and configurations for Elasticsearch, so skip that part if necessary. If you have not performed a backup, these are the steps to follow:
Create a backup folder location with the following command:
mkdir /opt/backup

# For some reason the 'other' group needed xx7 permission to the folder and im sure theres a tighter way to control this
chmod 777 /opt/backup
Edit the /etc/elasticsearch/elasticsearch.yml file and include the following line:
path.repo: ["/opt/backup"]
Now you will need to restart the Elasticsearch service if you updated the elasticsearch.yml file with the following:
sudo service elasticsearch restart
To perform the backup we need to get the index details, you do this by performing a web request to your Elasticsearch instance which may or may not be same box. Note the index in this case is the_hive_15. The number refers to the schema version.
curl 'localhost:9200/_cat/indices?v'

# Output
health status index       uuid                   pri rep docs.count docs.deleted store.size pri.store.size
yellow open   the_hive_15 spuKZM7tScq1IG7UxOwFwg   5   1      12249           97       65mb           65mb
To register a snapshot use this command.
curl -XPUT 'http://localhost:9200/_snapshot/the_hive_backup' -d '{
    "type": "fs",
    "settings": {
        "location": "/opt/backup",
        "compress": true
    }
}'

# Output if successful:
{"acknowledged":true}
Create the backup by using this command (replace <INDEX> with the index identified earlier, in this case it will be the_hive_15). You may also need to change your snapshot name <snapshot_2> if it already exists:
curl -XPUT 'http://localhost:9200/_snapshot/the_hive_backup/snapshot_2?wait_for_completion=true&pretty' -d '{
  "indices": "<INDEX>"
}'

# Output
{
  "snapshot" : {
    "snapshot" : "snapshot_2",
    "uuid" : "3nhTH609R-yS1hTozAVjEg",
    "version_id" : 5061699,
    "version" : "5.6.16",
    "indices" : [
      "the_hive_15"
    ],
    "state" : "SUCCESS",
    "start_time" : "2020-08-19T05:49:03.481Z",
    "start_time_in_millis" : 1597816143481,
    "end_time" : "2020-08-19T05:49:06.506Z",
    "end_time_in_millis" : 1597816146506,
    "duration_in_millis" : 3025,
    "failures" : [ ],
    "shards" : {
      "total" : 5,
      "failed" : 0,
      "successful" : 5
    }
  }
}
As I am using Hyper-V as my virtualisation layer, I have also created a snapshot of the server at this point for worst case failure. The same principals apply for esx-i, XenServer, VirtualBox, ProxMox etc.
Upgrade ES 5.6 to ES 6.8
Stop TheHive service
Shutdown TheHive service using the following commands:
sudo service thehive stop
sudo service thehive status
Disable shard allocation
Use the following command to disable shard allocation. My understanding is that this should not be required if we are running in a single node configuration as per Cluster Level Shard Allocation
curl -X PUT "localhost:9200/_cluster/settings" -H 'Content-Type: application/json' -d'
{
  "persistent": {
    "cluster.routing.allocation.enable": "none"
  }
}'

# Output
{"acknowledged":true,"persistent":{"cluster":{"routing":{"allocation":{"enable":"none"}}}},"transient":{}}
curl -X POST "localhost:9200/_flush/synced"

# Output
{"_shards":{"total":20,"successful":10,"failed":0},"the_hive_15":{"total":10,"successful":5,"failed":0},"the_hive_14":{"total":10,"successful":5,"failed":0}}
Stop ES 5.6 service
sudo service elasticsearch stop
sudo service elasticsearch status
Perform upgrade to ES 6.8
wget -qO - https://artifacts.elastic.co/GPG-KEY-elasticsearch | sudo apt-key add -
sudo apt-get install apt-transport-https
echo "deb https://artifacts.elastic.co/packages/6.x/apt stable main" | sudo tee -a /etc/apt/sources.list.d/elastic-6.x.list
sudo apt-get update && sudo apt-get install elasticsearch
If prompted that the elasticsearch.yml has been modified select N
Upgrade any plugins
In my case I did not have any plugins to upgrade. But these are the commands to use:
/usr/share/elasticsearch/bin/elasticsearch-plugin list

## for all plugin:
/usr/share/elasticsearch/bin/elasticsearch-plugin install $plugin
Update ES 6.8 configuration
Add the following 2 lines to the end of your /etc/elasticsearch/elasticsearch.yml file
path.logs: "/var/log/elasticsearch"
path.data: "/var/lib/elasticsearch"
Comment out the line for script.inline: true as it is not required.
Set $JAVA_HOME for ES
Find the path of your JavaJDK installation. For me, my installation was in /usr/lib/jvm/java-8-openjdk-amd64
Update /etc/default/elasticsearch and uncomment the JAVA_HOME setting and add your java path in. ie:
JAVA_HOME=/usr/lib/jvm/java-8-openjdk-amd64/
Update the permissions of the /etc/default/elasticsearch file
If you attempt to restart Elasticsearch at this point, the service will fail with the following error:
 elasticsearch.service - Elasticsearch
   Loaded: loaded (/usr/lib/systemd/system/elasticsearch.service; enabled; vendor preset: enabled)
   Active: failed (Result: exit-code) since Wed 2020-08-19 06:22:08 UTC; 5s ago
     Docs: http://www.elastic.co
  Process: 3094 ExecStart=/usr/share/elasticsearch/bin/elasticsearch -p ${PID_DIR}/elasticsearch.pid --quiet (code=exited, status=1/FAILURE)
 Main PID: 3094 (code=exited, status=1/FAILURE)

Aug 19 06:22:08 thehive systemd[1]: Started Elasticsearch.
Aug 19 06:22:08 thehive elasticsearch[3094]: /usr/share/elasticsearch/bin/elasticsearch-env: line 71: /etc/default/elasticsearch: Permission denied
Aug 19 06:22:08 thehive systemd[1]: elasticsearch.service: Main process exited, code=exited, status=1/FAILURE
Aug 19 06:22:08 thehive systemd[1]: elasticsearch.service: Failed with result 'exit-code'.
This can be corrected by fixing the permissions on the file.
chmod o+r /etc/default/elasticsearch
Restart ES 6.8
Use the following commands to enable Elasticsearch on restart and to manaully start the service now:
sudo update-rc.d elasticsearch defaults 95 10
sudo service elasticsearch start
sudo service elasticsearch status
Check that ES is running
Now with all the required Elasticsearch configuration completed, all going well you should be able to execute the following command to check the installation. Note that the version is now 6.8.12.
curl -X GET "localhost:9200/"

# Output

{
  "name" : "JDfJ33I",
  "cluster_name" : "hive",
  "cluster_uuid" : "QA5Qtex2TjecSbwhz5DcSA",
  "version" : {
    "number" : "6.8.12",
    "build_flavor" : "default",
    "build_type" : "deb",
    "build_hash" : "7a15d2a",
    "build_date" : "2020-08-12T07:27:20.804867Z",
    "build_snapshot" : false,
    "lucene_version" : "7.7.3",
    "minimum_wire_compatibility_version" : "5.6.0",
    "minimum_index_compatibility_version" : "5.0.0"
  },
  "tagline" : "You Know, for Search"
}
If you try this command before Elasticsearch has had a chance to start fully you will see this error. Try it again after a few seconds:
curl: (7) Failed to connect to localhost port 9200: Connection refused
Re-enable shard allocation
curl -X PUT "localhost:9200/_cluster/settings" -H 'Content-Type: application/json' -d'
{
  "persistent": {
    "cluster.routing.allocation.enable": null
  }
}'

# Output
{"acknowledged":true,"persistent":{},"transient":{}}
Re-Enable TheHive and Start
You can re-enable the autostart of TheHive and start the service with the following commands:
sudo service thehive start
Post ES 6.8 Upgrade - Test TheHive
At this point, we have completed the first part of this process…upgrading ElasticSearch from 5.6 to 6.8. Test that you can login to TheHive without and issues and perform some basic sanity tests.
It is advisable to create a snapshot of your server at this time before you progress to the next part of the upgrade.
Perform migration from ES 6.8 to ES 7.8
Install Prerequisite: JQ
Having the jq package installed makes parsing json formatting so much easier!
sudo apt-get install -qy jq
Identify if your index should be reindexed
As my original installation of TheHive was done under ES 5.6 environment, my data will require a reindex so that it can be read by ES 7.8. If you started your journey with TheHive prior to version 3.4 then there is a fairly good chance that this is going to be required. This can be confirmed by running the following command:
curl -s http://127.0.0.1:9200/the_hive_15?human | jq '.the_hive_15.settings.index.version.created_string'

# Output
"5.6.16"
Make a note of the current indices on you Elasticsearch instance
curl  http://localhost:9200/_cat/indices\?v

# Output
health status index       uuid                   pri rep docs.count docs.deleted store.size pri.store.size
yellow open   the_hive_15 spuKZM7tScq1IG7UxOwFwg   5   1      12249           97       65mb           65mb
Stop TheHive service
Shutdown TheHive service using the following command:
sudo service thehive stop
sudo service thehive status
Create a new index
We need to create a new index with the same settings as our existing index. Using the official migration guide from TheHive has this command with \ separated lines. I found that this did not create the index correctly and threw an error error: syntax error, unexpected INVALID_CHARACTER (Unix shell quoting issues?) at <top-level>, line 1:
Stripping out the \ line breaks and running it as a single line command did the trick for me.
curl -XPUT 'http://localhost:9200/new_the_hive_15' -H 'Content-Type: application/json' -d "$(curl http://localhost:9200/the_hive_15 | jq '.the_hive_15 | del(.settings.index.provided_name,.settings.index.creation_date,.settings.index.uuid,.settings.index.version,.settings.index.mapping.single_type,.mappings.doc._all)' )"

# Output
{"acknowledged":true,"shards_acknowledged":true,"index":"new_the_hive_15"}
Confirm new_the_hive_15 index has been created
Note that the docs.count for the new index is 0. At this time we have only created a new index.
curl -XGET http://localhost:9200/_cat/indices\?v

# Output
health status index           uuid                   pri rep docs.count docs.deleted store.size pri.store.size
yellow open   new_the_hive_15 VPj0S8QqT1mO1kK2r4ADMQ   5   1          0            0      1.1kb          1.1kb
yellow open   the_hive_15     spuKZM7tScq1IG7UxOwFwg   5   1      12245          105       65mb           65mb
Reindex the data
The following command reindexes the data from the_hive_15 index to new_the_hive_15 index.
curl -XPOST -H 'Content-Type: application/json' http://localhost:9200/_reindex -d '{
  "conflicts": "proceed",
  "source": {
    "index": "the_hive_15"
  },
  "dest": {
    "index": "new_the_hive_15"
  }
}' | jq

# Output
{
  "took": 5436,
  "timed_out": false,
  "total": 7032,
  "updated": 0,
  "created": 7032,
  "deleted": 0,
  "batches": 8,
  "version_conflicts": 0,
  "noops": 0,
  "retries": {
    "bulk": 0,
    "search": 0
  },
  "throttled_millis": 0,
  "requests_per_second": -1,
  "throttled_until_millis": 0,
  "failures": []
}
If you receive json data that contains failure, DO NOT PROCEED, there is a good chance that the migration stopped on the first error. To start with, check the command you used create new_the_hive_15. Use a tool such as Kaizen if you are unfamiliar with querying Elasticsearch from a curl command. Check that the database schema was created correctly.
Post Reindex Check
Check the status of the reindex with the following command:
curl -XGET http://localhost:9200/_cat/indices\?v

# Output

health status index           uuid                   pri rep docs.count docs.deleted store.size pri.store.size
yellow open   new_the_hive_15 VPj0S8QqT1mO1kK2r4ADMQ   5   1      12245            0     47.7mb         47.7mb
yellow open   the_hive_15     spuKZM7tScq1IG7UxOwFwg   5   1      12245          105       65mb           65mb
Note that the docs.count match. If there was an error these values would not match and you would have data loss.
Delete old index the_hive_15
Now we have confirmed that the docs.count values match and that the reindex was a success, delete any old existing indexes with the following command:
curl -XDELETE http://localhost:9200/the_hive_15

# Output
{"acknowledged": true}
IMPORTANT: Elasticsearch will not start if there is an index that was created in an older version of ES. In one case I still had the_hive_14 index.
One of my tests, I had an older version of TheHive data (the_hive_14). When ES 7.8 tried to start I saw the following error in /var/log/elasticsearch/hive.log
The index [[the_hive_14/X5as-mOjTuibInspQ_TKLg]] was created with version [5.6.16] but the minimum compatible version is [6.0.0-beta1]. It should be re-indexed in Elasticsearch 6.x before upgrading to 7.9.0.
If you need to recover from this error, you need to grab the index reference (in this case its X5as-mOjTuibInspQ_TKLg) and then delete it from the disk. You can use rm -rf /var/lib/elasticsearch/nodes/0/indices/X5as-mOjTuibInspQ_TKLg for this. This index is now lost.
Alias new_the_hive_15 to the_hive_15
curl -XPOST -H 'Content-Type: application/json'  'http://localhost:9200/_aliases' -d '{
    "actions": [
        {
            "add": {
                "index": "new_the_hive_15",
                "alias": "the_hive_15"
            }
        }
    ]
}'

# Output
{"acknowledged":true}
Confirm this with the following command:
curl -XGET http://localhost:9200/_alias?pretty

# Output
{
  "new_the_hive_15" : {
    "aliases" : {
      "the_hive_15" : { }
    }
  }
}
Upgade openjdk8 to openjdk11
When I started ES 7.8 on my first run, I started getting warnings about JDK8.
[thehive] future versions of Elasticsearch will require Java 11; your Java version from [/usr/lib/jvm/java-8-openjdk-amd64/jre] does not meet this requirement
It can upgrade it with the following command:
apt-get install openjdk-11-jre-headless
Upgrade to ES 7.8
Keep going, were nearly there!
Update /etc/elasticsearch/elasticsearch.yml file
Create a backup of the elasticsearch.yml file with the following command:
cp /etc/elasticsearch/elasticsearch.yml /etc/elasticsearch/elasticsearch.yml.es68
Make the following configuration changes to /etc/elasticsearch/elasticsearch.yml:
network.host: 127.0.0.1
cluster.name: hive
# thread_pool.index.queue_size: 100000   # ES 6
thread_pool.search.queue_size: 100000    # ES 7
# thread_pool.bulk.queue_size: 100000    # ES 6
thread_pool.write.queue_size: 10000      # ES 7
path.repo: ["/opt/backup"]
path.logs: "/var/log/elasticsearch"
path.data: "/var/lib/elasticsearch"
node.data: true
discovery.type: single-node
Disable Shard Allocation
Once again, I beleive that this only applies to clustered environments.
curl -X PUT "localhost:9200/_cluster/settings?pretty" -H 'Content-Type: application/json' -d'
{
  "persistent": {
    "cluster.routing.allocation.enable": "primaries"
  }
}'
curl -X POST "localhost:9200/_flush/synced?pretty"
Stop ES 6.8
We must stop Elasticsearch in order to upgrade it. Use the following commands:
sudo service elasticsearch stop
sudo service elasticsearch status
Upgrade ES 6.8 to 7.8
Use the following commands to upgrade Elasticsearch to 7.8
wget -qO - https://artifacts.elastic.co/GPG-KEY-elasticsearch | sudo apt-key add -
sudo apt-get install apt-transport-https
echo "deb https://artifacts.elastic.co/packages/7.x/apt stable main" | sudo tee -a /etc/apt/sources.list.d/elastic-7.x.list
sudo apt-get update && sudo apt-get install elasticsearch
If prompted that the files have been modified select N. I was prompted about the following files:
/etc/elasticsearch/elasticsearch.yml/etc/default/elasticsearch
Update $JAVA_HOME for ES 7.8
Now that we have updated JDK to version 11, we need to update the /etc/default/elasticsearch file and change the JAVA_HOME setting from java-8 to java-11.
JAVA_HOME=/usr/lib/jvm/java-11-openjdk-amd64/
Upgrade any plugins (ES7.8)
In my case I did not have any plugins to upgrade
/usr/share/elasticsearch/bin/elasticsearch-plugin list
## for all plugin:
/usr/share/elasticsearch/bin/elasticsearch-plugin install $plugin
Start ES 7.8
sudo service elasticsearch start
sudo service elasticsearch status
Re-enable shard allocation (ES 7.8)
curl -X PUT "localhost:9200/_cluster/settings" -H 'Content-Type: application/json' -d'
{
  "persistent": {
    "cluster.routing.allocation.enable": null
  }
}'
Upgrade TheHive to 3.5
For my particular installation I have used the extracted binaries, so I used the following steps to upgrade. At this time double check that thehive service is still stopped.
sudo service thehive status
Add PGP Keys
cd /opt
curl https://raw.githubusercontent.com/TheHive-Project/TheHive/master/PGP-PUBLIC-KEY | sudo apt-key add -
Download TheHive 3.5.0 RC1
wget https://download.thehive-project.org/thehive-beta-latest.zip
Extract TheHive 3.5.0 RC1
sudo unzip thehive-beta-latest.zip
Break the Symlink
sudo rm thehive
sudo ln -s thehive-3.5.0-RC1-1 thehive
Copy over the existing application.conf file
sudo cp /opt/thehive-3.4.0-1/conf/application.conf /opt/thehive/conf/
Restart TheHive 3.5.0 RC1
Now we have extracted the binaries, updated the Symlink and recopied over the application.conf file, the last step is to start TheHive and perform a DB update.
sudo service thehive start
sudo service thehive status
Update TheHive DB
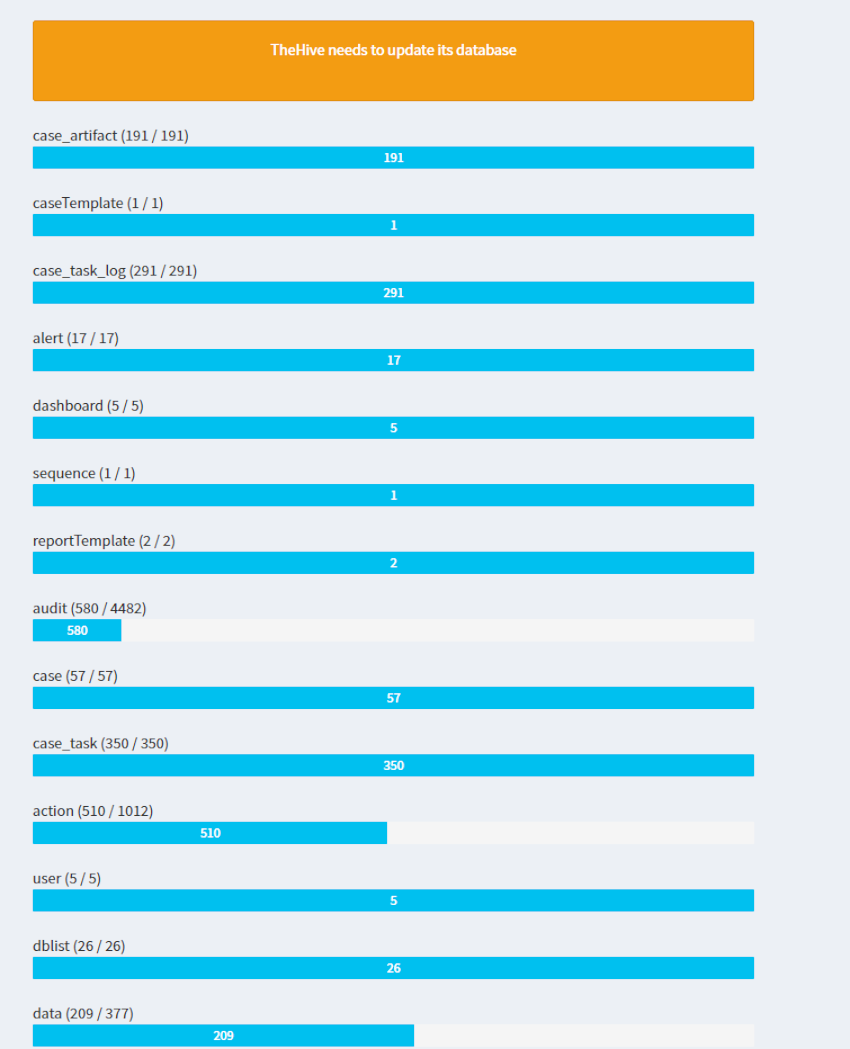
Navigate to TheHive with your browser. You should be presented to perform a DB Update at this time. This will create the_hive_16 index in Elasticsearch.

Once you press upgrade Database the following happens
Once the DB update has completed, I found the webpage just had a spinning logo. I had to refresh the page to see the logon page.
After logging in and selecting About here are the new system details

You can also check the Elasticsearch indexes with the following command. The docs.count should still match.
curl 'localhost:9200/_cat/indices?v'

# Output
health status index           uuid                   pri rep docs.count docs.deleted store.size pri.store.size
yellow open   new_the_hive_15 VPj0S8QqT1mO1kK2r4ADMQ   5   1      12245            0     47.7mb         47.7mb
yellow open   the_hive_16     p1kGT2HDR5esDHh57ZTw2Q   5   1      12245            1     48.8mb         48.8mb
Wrap up
Well this was a fairly lengthy upgrade process and if you find yourself in this situation, stand up a test system, restore live data to it and try it out under safe conditions. Once TheHive 3.5 comes out of Release Candidate, upgrading it should be just a matter of upgrading the binaries. This guide should still be relevant if your not going to the RC first.
Next….time to do the same for Cortex!