By Adrian | December 7, 2022
So I wanted to do something which has been done many times before and that was to create an SSH honeypot for some threat intelligence collection purposes. The twist to this is that I want to send the results to MISP and I came across a few hicups along the way.
Ive previously blogged about Fail2Ban and it got me thinking, what if I added a secondary action to send the resulting banned ip into MISP. MISP does have an object for fail2ban and an extensive API. But I still needed a way for the honeypot to send its logs to MISP.
I didnt want to run MISP up on a cloud instance as the requirements are quite beefy and for the development work im playing around with it doesnt justify the spend. I also didnt want to directly connect the honeypot to any thing else. Things needed to be locked down.
I had a thought. What if the banned ip’s from fail2ban sent its data to Amazon SQS, that way my MISP instance could just poll the SQS queue and process it directly.
With that I got to hacking up a few scripts.
Setup a base server
I have a nifty little powershell script that I wrote that will pull down the userdata config file from S3 and request a spot instance. To setup a spot instance you need quite a few variables from various AWS Services such as IAM, VPC, EC2, S3. In any case all you need is a server that can likely be abused. Doesnt even need to be in the AWS cloud.
Create IAM User
In the AWS Console, naviate to Identity and Access Management (IAM) and select Users down the left. Create a new user with programtic access. Don’t assign any permissions or tags at this time. Make a note of the access key and secret access key.
In the IAM console, make sure to grab the User ARN (arn:aws:iam::AWS_ACCOUNT:user/USERNAME) as we will need it later.
Create SQS
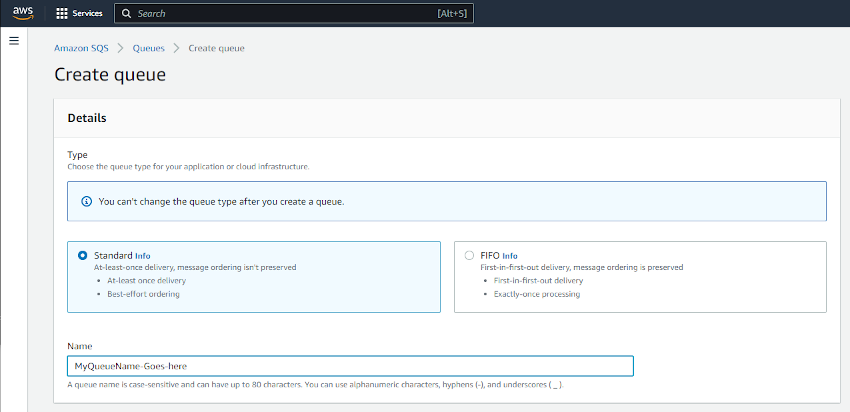
In your desired region navigate to Amazon SQS and select Create Queue. Ensure that Standard is selected and give the queue a creative name.
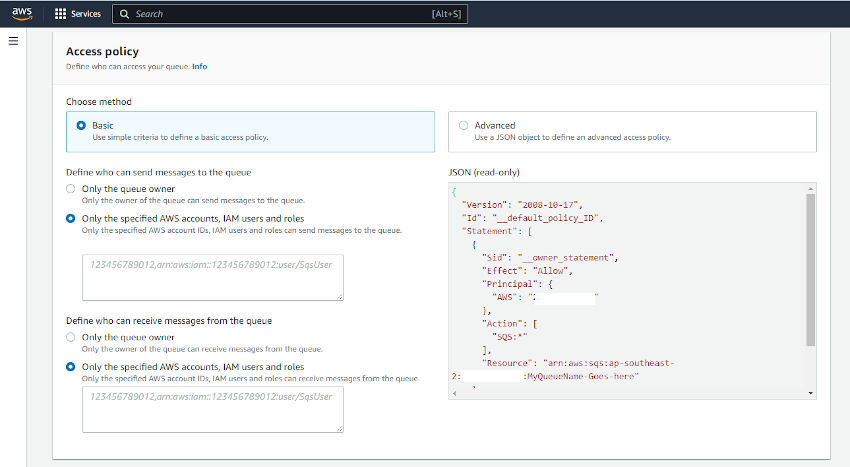
Under Access Policy ensure that Only the specified AWS accounts, IAM users and roles is selected and your IAM user ARN is entered for who can send/receive messages on the queue. This was copied from the previous step.
Once the queue has been created, copy the SQS url (https://sqs.AWS_REGION.amazonaws.com/AWS_ACCOUNT/SQS_QUEUENAME) and ARN (arn:aws:sqs:AWS_REGION:AWS_ACCOUNT:SQS_QUEUENAME)
Setup IAM permissions who can read/write messages to SQS
Naviate back to Identity and Access Management (IAM) and select Policies -> Create Policy. Select JSON and paste in the following policy substituting the Resource for the SQS ARN
{
    "Version": "2012-10-17",
    "Statement": [
        {
            "Sid": "VisualEditor0",
            "Effect": "Allow",
            "Action": [
                "sqs:DeleteMessage",
                "sqs:GetQueueUrl",
                "sqs:ReceiveMessage",
                "sqs:SendMessage"
            ],
            "Resource": "arn:aws:sqs:REGION:ACCOUNT:SQS_NAME"
        },
        {
            "Sid": "VisualEditor1",
            "Effect": "Allow",
            "Action": "sqs:ListQueues",
            "Resource": "*"
        }
    ]
}
Setup the honeypot
On your server we need to perform a few installs, so SSH to it and perform the following:
AWSCLI
apt install zip unzip -qy
curl "https://awscli.amazonaws.com/awscli-exe-linux-x86_64.zip" -o "awscliv2.zip"
unzip -qq awscliv2.zip
./aws/install
Requirements for sending to SQS
apt install python3-pip -qy
python3 -m pip install boto3 argparse
Fail2Ban
wget https://github.com/fail2ban/fail2ban/releases/download/1.0.2/fail2ban_1.0.2-1.upstream1_all.deb
dpkg -i fail2ban_1.0.2-1.upstream1_all.deb
Enable SSH and start Firewall
ufw allow 22
ufw enable
Custom Fail2Ban config
Now the base software is installed, create the following files
/etc/fail2ban/jail.local
The jail.local file is the custom configuration used for the Fail2Ban Jails that are configured. Note the addition of a second action sendtosqs
[sshd]

# To use more aggressive ssh modes set filter parameter "mode":
# normal (default), ddos, extra or aggressive (combines all).
# See "tests/files/logs/sshd" or "filter.d/sshd.conf" for usage example and details.
#mode     = normal
port      = ssh
enabled   = true
filter    = sshd
banaction = iptables-multiport
bantime   = 3600
maxretry  = 2
logpath   = %(sshd_log)s
backend   = %(sshd_backend)s
action    = iptables-multiport
            sendtosqs
/etc/fail2ban/action.d/sendtosqs.conf
This file defines the sendtosqs action. The only part of this config file that is populated is the actionban. It is set to call a shell script with 2 arguments. The banned IP and Time.
[Definition]

# Option: actionstart
# Notes : command executed once at the start of Fail2Ban
# Tags  :
# Values: CMD
actionstart =

# Option: actionstop
# Notes : command executed once at the end of Fail2Ban
# Tags  :
# Values: CMD
actionstop =

# Option: actioncheck
# Notes : command executed once before each actionban command
# Tags  :
# Values: CMD
actioncheck =

# Option: actionban
# Notes : command executed when banning an IP. Take care that the
#         command is executed with Fail2Ban user rights.
# Tags  : <ip> IP address
#         <failures> number of failures
#         <time> unix timestamp of the ban time
# Values: CMD
actionban = /bin/sh /etc/fail2ban/action.d/sendtosqs.sh <ip> <time>

# Option: actionunban
# Notes : command executed when unbanning an IP. Take care that the
#         command is executed with Fail2Ban user rights.
# Tags  : <ip> IP address
#         <failures> number of failures
#         <time> unix timestamp of the ban time
# Tags  :
# Values: CMD
actionunban =

[Init]

name = sendtosqs
/home/user/settings.py
The settings.py file contains the variables for the main script. Populate as appropriate. Ensure your IAM user has the least access as possible!
region = 'AWS_REGION'
access_key = 'ACCESS_KEY_FOR_SQS_USER'
secret_key = 'SECRET_KEY_FOR_SQS_USER'
sqs_queue = 'SQS_QUEUENAME'
sqs_queue_url = 'https://sqs.AWS_REGION.amazonaws.com/AWS_ACCOUNT/SQS_QUEUENAME'
/home/user/send_to_sqs.py
I grabbed this python script from a MISP repository and added in the code so that a message can be sent. This script takes command line arguments which are fed from the shell script
import boto3, argparse, json
from settings import region, access_key, secret_key

if __name__ == '__main__':

    parser = argparse.ArgumentParser(description='Send to SQS')
    parser.add_argument("-q", "--sqs_queue", required=True, help="Name of the SQS Queue")
    parser.add_argument("-b", "--banned_ip", required=True, help="Banned IP address.")
    parser.add_argument("-a", "--attack_type", required=True, help="Type of attack.")
    parser.add_argument("-t", "--tag", required=True, help="Tag to search on MISP.")
    parser.add_argument("-s", "--sensor", required=True, help="Sensor identifier.")
    parser.add_argument("-p", "--processing_timestamp", help="Processing timestamp.")
    args = parser.parse_args()

    client = boto3.resource('sqs', region_name=region, aws_access_key_id=access_key, aws_secret_access_key=secret_key)
    queue = client.get_queue_by_name(QueueName=args.sqs_queue)

    if args.processing_timestamp:
        timestamp = args.processing_timestamp
    else:
        timestamp = None

    message = {
        "ip": args.banned_ip,
        "attack_type": args.attack_type,
        "tag": args.tag,
        "sensor": args.sensor,
        "processing_timestamp": timestamp
        }

    response = queue.send_message(MessageBody=json.dumps(message))
/etc/fail2ban/action.d/sendtosqs.sh
This 1 liner shell script executes the SQS python file using the following command line arguments:
-q: specify the SQS Queuename-b $1: The banned IP Address (passed from the ban action)-a: Attack Type-t: Tag to apply when it gets to MISP-s $(hostname -I): The sensor’s IP address-p $2: The processing timestamp (passed from the ban action)
python3 /home/user/send_to_sqs.py -q SQS_QUEUE_NAME -b $1 -a bruteforce -t fail2ban -s $(hostname -I) -p $2
Once you have created these files and replaced the placeholders with your required information restart the fail2ban service:
sudo systemctl restart fail2ban && sudo systemctl status fail2ban
The trap is set
With all the configuration done, it didnt take long before the first IP was banned. At this time, you can check this by accessing the SQS queue in the AWS Console and selecting Send and receive messages, Poll for messages
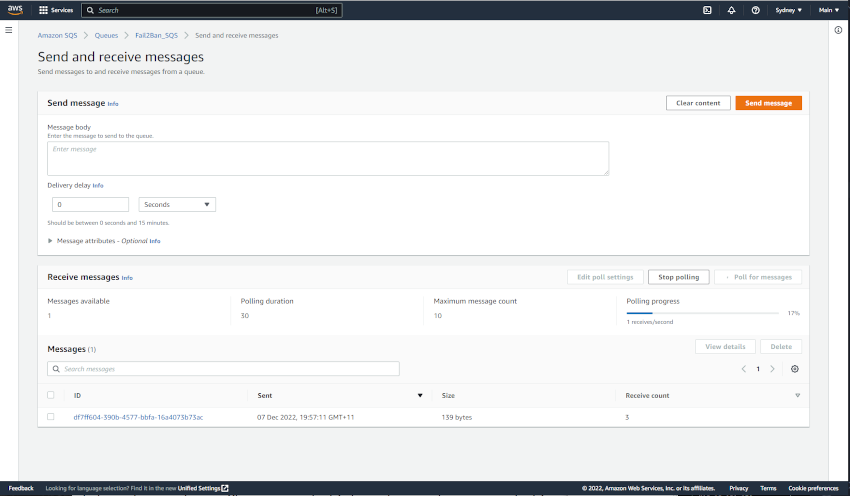
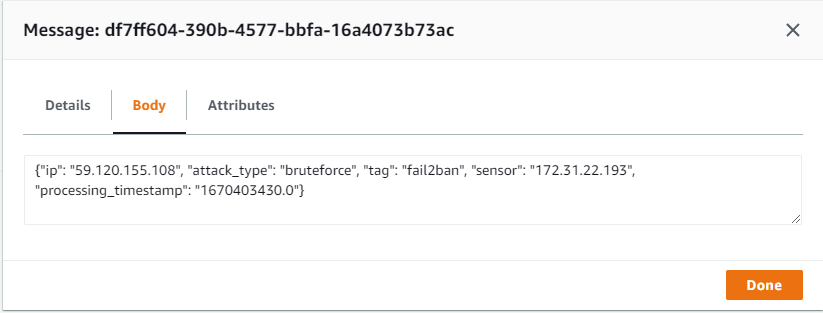
I see you 59.120.155[.]108. Congratulations for being the first.
MISP Configuration
So that MISP can read the SQS Queue that has been setup you need the following files. You could set this up on any box that has access to both AWS and the MISP instance. In this case, I have configured it on a seperate Ubuntu VM.
/home/user/settings.py (for the poller)
Same as the settings.py file that we copied onto the Honeypot. It contains our IAM User with permissions to read the SQS Queue messages. It also contains the URL that we will poll.
/home/user/keys.py
This file contains the URL and API key for MISP.
#!/usr/bin/env python3
# -*- coding: utf-8 -*-

misp_url = 'MISP_URL'
misp_key = 'MISP_API_KEY' # The MISP auth key can be found on the MISP web interface under the automation section
misp_verifycert = False
misp_client_cert = ''
/home/user/retreive_from_sqs.py
Setup a cron job every 5 mins or so to call this python script. It polls the SQS_Queue, and then calls a second python script which creates the entry in MISP and deletes the message from SQS.
import boto3, json, os
from settings import region, access_key, secret_key, sqs_queue

if __name__ == '__main__':

    client = boto3.resource('sqs', region_name=region, aws_access_key_id=access_key, aws_secret_access_key=secret_key)
    queue = client.get_queue_by_name(QueueName=sqs_queue)

    # Receive a message
    messages = queue.receive_messages(MaxNumberOfMessages=10, WaitTimeSeconds=20)
    for message in messages:

        json_msg = json.loads(message.body)
        banned = json_msg['ip']
        attack_type = json_msg['attack_type']
        tag = json_msg['tag']
        processing_timestamp = json_msg['processing_timestamp']
        sensor = json_msg['sensor']

        os.system("sqs/add_fail2ban_object.py -b " + banned + " -a " + attack_type + " -t " + tag + " -p " + processing_timestamp + " -s " + sensor + " -d")


        # Let the queue know that the message is processed
        message.delete()
/home/user/add_fail2ban_object.py
This is script that was lifted from the pyMisp github repo. It takes command line arguments which are passed in from the first script.
#!/usr/bin/env python3
# -*- coding: utf-8 -*-

from pymisp import ExpandedPyMISP, MISPEvent
from pymisp.tools import Fail2BanObject
import argparse
from base64 import b64decode
from io import BytesIO
import os
from datetime import date, datetime
from dateutil.parser import parse


try:
    from keys import misp_url, misp_key, misp_verifycert
except Exception:
    misp_url = 'URL'
    misp_key = 'AUTH_KEY'
    misp_verifycert = True


def create_new_event():
    me = MISPEvent()
    me.info = "Fail2Ban blocking"
    me.add_tag(args.tag)
    start = datetime.now()
    me.add_attribute('datetime', start.isoformat(), comment='Start Time')
    return me


if __name__ == '__main__':

    parser = argparse.ArgumentParser(description='Add Fail2ban object.')
    parser.add_argument("-b", "--banned_ip", required=True, help="Banned IP address.")
    parser.add_argument("-a", "--attack_type", required=True, help="Type of attack.")
    parser.add_argument("-t", "--tag", required=True, help="Tag to search on MISP.")
    parser.add_argument("-p", "--processing_timestamp", help="Processing timestamp.")
    parser.add_argument("-f", "--failures", help="Amount of failures that lead to the ban.")
    parser.add_argument("-s", "--sensor", help="Sensor identifier.")
    parser.add_argument("-v", "--victim", help="Victim identifier.")
    parser.add_argument("-l", "--logline", help="Logline (base64 encoded).")
    parser.add_argument("-F", "--logfile", help="Path to a logfile to attach.")
    parser.add_argument("-n", "--force_new", action='store_true', default=False, help="Force new MISP event.")
    parser.add_argument("-d", "--disable_new", action='store_true', default=False, help="Do not create a new Event.")
    args = parser.parse_args()

    pymisp = ExpandedPyMISP(misp_url, misp_key, misp_verifycert, debug=True)
    event_id = -1
    me = None
    if args.force_new:
        me = create_new_event()
    else:
        response = pymisp.search_index(tags=args.tag, timestamp='1h', pythonify=True)
        if response:
            if args.disable_new:
                event_id = response[0].id
            else:
                last_event_date = parse(response[0].date).date()
                nb_attr = response[0].attribute_count
                if last_event_date < date.today() or int(nb_attr) > 1000:
                    me = create_new_event()
                else:
                    event_id = response[0].id
        else:
            me = create_new_event()

    parameters = {'banned-ip': args.banned_ip, 'attack-type': args.attack_type}
    if args.processing_timestamp:
        parameters['processing-timestamp'] = args.processing_timestamp
    if args.failures:
        parameters['failures'] = args.failures
    if args.sensor:
        parameters['sensor'] = args.sensor
    if args.victim:
        parameters['victim'] = args.victim
    if args.logline:
        parameters['logline'] = b64decode(args.logline).decode()
    if args.logfile:
        with open(args.logfile, 'rb') as f:
            parameters['logfile'] = {'value': os.path.basename(args.logfile),
                                     'data': BytesIO(f.read())}
    f2b = Fail2BanObject(parameters=parameters, standalone=False)
    if me:
        me.add_object(f2b)
        pymisp.add_event(me)
    elif event_id:
        a = pymisp.add_object(event_id, f2b)
UUID 4122 ERROR
Not so fast. I’m running the latest version of MISP (at the time of writing its v2.4.166). What I was finding is that I wasnt able to create a Fail2Ban object in a MISP event. At first I thought it was PyMisp giving me the error, until I tried manually creating it in the GUI.
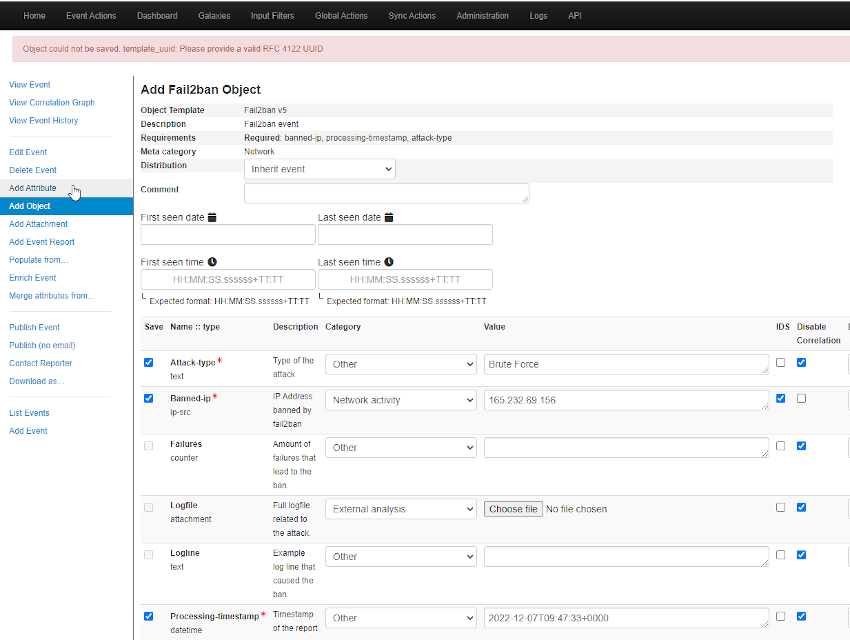
It was not the script!
To fix this I had to SSH onto my MISP instance and edit /var/www/MISP/app/files/misp-objects/fail2ban/definition.json.
The original UUID for this object was 8be2271-7326-41a5-a0dd-9b4bec88e1ba. I plugged this into a UUID generator and it came back as invalid.
To get around this issue, I manually created a new valid UUID and updated the version to 6. Then in MISP under Global Actions, List Object Templates, manually refresh the fail2ban template. Im unsure what repercussions this will have when the actual object is updated by the MISP team. So warning there.
...
...
  "uuid": "ca4be832-963f-4988-8557-619e8af2a36a",
  "version": 6
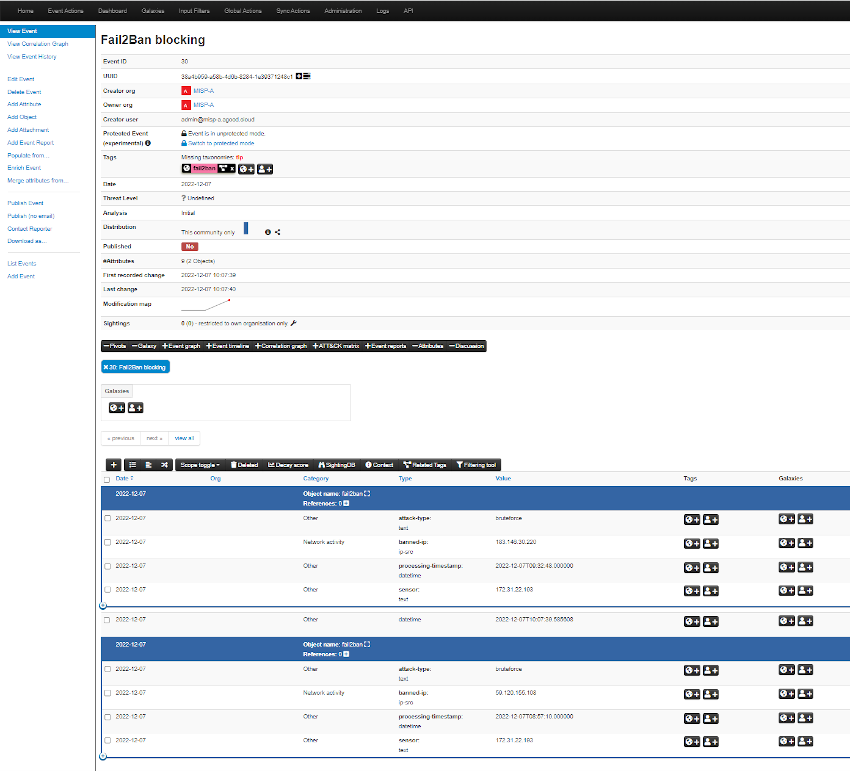
Import the event
All going well to this point the cron should now be creating MISP events. In the time that its taken me to write this blog, more IP’s have hit and created an SQS message. One thing to note with SQS is that when you poll for messages, due to the distributed nature of the AWS service, you may not get all messages at once, or in order (we are not using a FIFO queue). The Cron job should eventually pickup all the messages.
There are still a few things I need to sort out, such as applying multiple tags (ie: TLP), and automatically publishing the event, I hope you found this useful. I certainly learned a few new tricks along the way.