By Adrian | April 22, 2019
This is the first post about my journey of standing up a TheHive/Cortex/MISP environment. Other posts can be found here:
Part I - Building TheHive
Part II - Setup reverse proxy for TheHive
Part III - Building MISP
Part IV - Building Cortex
Part V - Adding analyzers to Cortex
Part VI - Setup reverse proxy for Cortex
Part VII - Integrate TheHive and Cortex
Part VIII - Integrate MISP to TheHive
Part IX - Upgrading TheHive
Part X - Updating MISP
Part XI - Upgrading Cortex
Part XII - Wrapup of TheHive, MISP, Cortex
Its been a while since I have last updated this blog and quite a lot has happened in the past month or so which has taken my attention away. Ive still been as busy as ever, studying, reading and starting a new job.
There are a suite of open source applications that we use and I thought, what better way to get to know them than by labbing them up myself and getting to know the quirks and the general usage. This blog entry is dedicated to TheHive, which is a case management system designed for Security Operations Teams but it has so much more power when you integrate other applications such as Cortex and MISP.
Here are my as build instructions. This is the first part of many.
Create Ubuntu 18.04 Server
A VM is a VM. Im using Hyper-V in this case, but you could use VMWare esxi, VMWare Workstation, Virtual Box or one of many other virtualisation providers in this space
Update the Operating System
After the OS has been built, perform a standard OS update and reboot
sudo apt-get update && sudo apt-get upgrade && sudo reboot now
Install OpenJDK
sudo add-apt-repository ppa:openjdk-r/ppa
sudo apt-get update
sudo apt-get install openjdk-8-jre-headless
Install Elasticsearch
TheHive requires Elasticsearch to be installed. As this is a lab environment, im going to install it onto the same VM.
# PGP key installation
sudo apt-key adv --keyserver hkp://keyserver.ubuntu.com:80 --recv-key D88E42B4

# Debian repository configuration
echo "deb https://artifacts.elastic.co/packages/5.x/apt stable main" | sudo tee -a /etc/apt/sources.list.d/elastic-5.x.list

# Install https support for apt
sudo apt install apt-transport-https

# Elasticsearch installation
sudo apt update && sudo apt install elasticsearch
Edit /etc/elasticsearch/elasticsearch.yml and add the following lines:
network.host: 127.0.0.1
script.inline: true
cluster.name: hive
thread_pool.index.queue_size: 100000
thread_pool.search.queue_size: 100000
thread_pool.bulk.queue_size: 100000
Create the service and start it
sudo systemctl enable elasticsearch.service
sudo systemctl start elasticsearch.service
sudo systemctl status elasticsearch.service
Install TheHive
I found some issues with the documentation where some of it was pointing to /opt and other parts to /etc so these were the steps that I took to get this working.
sudo apt-get install unzip
cd /opt
sudo wget https://dl.bintray.com/thehive-project/binary/thehive-latest.zip
sudo unzip thehive-latest.zip
sudo ln -s thehive-3.3.0-1 thehive
Modify /opt/thehive/package/thehive.service modifying the ExecStart block as this was pointing at /etc but we have installed it to /opt
ExecStart=/opt/thehive/bin/thehive \
        -Dconfig.file=/opt/thehive/conf/application.conf \
        -Dlogger.file=/opt/thehive/conf/logback.xml \
        -Dpidfile.path=/dev/null
Update the Secret Key in the application.conf file
(cat << _EOF_
# Secret key
# ~~~~~
# The secret key is used to secure cryptographics functions.
# If you deploy your application to several instances be sure to use the same key!
play.http.secret.key="$(cat /dev/urandom | tr -dc 'a-zA-Z0-9' | fold -w 64 | head -n 1)"
_EOF_
) | sudo tee -a /opt/thehive/conf/application.conf
Setup TheHive as a service
sudo addgroup thehive
sudo adduser --system thehive
sudo cp /opt/thehive/package/thehive.service /usr/lib/systemd/system
sudo chown -R thehive:thehive /opt/thehive
sudo chgrp thehive /opt/thehive/conf/application.conf
sudo chmod 640 /opt/thehive/conf/application.conf
sudo systemctl enable thehive
sudo service thehive start
First Access
All going to plan, you should be able to access TheHive on http://hostname:9000. At this point you will be prompted to upgrade the database.

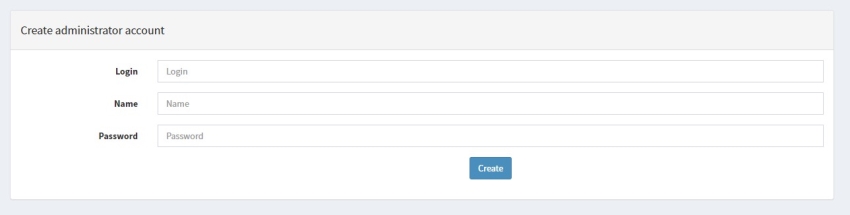
Once that step is complete, you will need to configure the admin account. Its important that this is not skipped at this time.
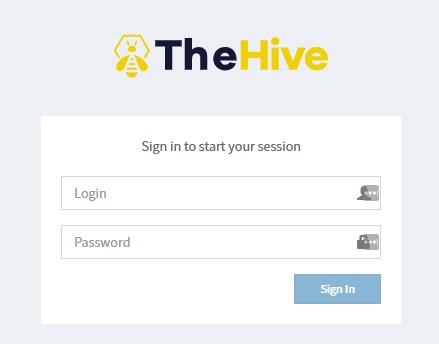
You can now login to TheHive with this newly created account.
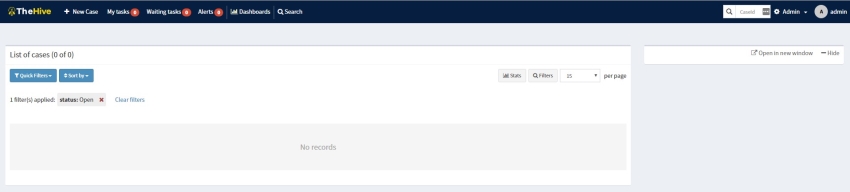
Now I can start to look at what other functionality and integrations are available as well as getting a general feel for how useful TheHive will be.