By Adrian | April 29, 2019
This is part 3 of TheHive/Cortex/MISP build. In this part were installing MISP. Links to the previous articles are here:
Part I - Building TheHive
Part II - Setup reverse proxy for TheHive
Part III - Building MISP
Part IV - Building Cortex
Part V - Adding analyzers to Cortex
Part VI - Setup reverse proxy for Cortex
Part VII - Integrate TheHive and Cortex
Part VIII - Integrate MISP to TheHive
Part IX - Upgrading TheHive
Part X - Updating MISP
Part XI - Upgrading Cortex
Part XII - Wrapup of TheHive, MISP, Cortex
TheHive has a number of open source tools that just work together and one of those tools is MISP or Malware Information Sharing Platform - although MISP has become more than its roots these days.
This entry ill describe the steps that I took to setup and configure a MISP instance.
Create Ubuntu 18.04 Server
A VM is a VM. Im using Hyper-V in this case, but you could use VMWare esxi, VMWare Workstation, Virtual Box or one of many other virtualisation providers in this space. Nothing really new here.
Update the Operating System After the OS has been built, perform a standard OS update and reboot
sudo apt-get update && sudo apt-get upgrade && sudo reboot now
Install MISP
The installation was very straightforward with an install script that is provided. In the past the entire setup was quite a manual one! The only thing I was prompted for during the installation was the sudo password.
curl -fsSL https://raw.githubusercontent.com/MISP/MISP/2.4/INSTALL/INSTALL.sh | bash -s -- -c -M
Configure Lets Encrypt SSL Certificate
Install certbot components
sudo apt-get update
sudo apt-get install software-properties-common
sudo add-apt-repository universe
sudo add-apt-repository ppa:certbot/certbot
sudo apt-get update
sudo apt-get install certbot python-certbot-apache
So we can add in the route53 extension to certbot we need to install python3-pip
sudo apt install python3-pip
sudo pip3 install certbot-dns-route53
Get the awscli package
sudo apt-get install awscli
You can configure the aws credentials with this command. You will need to create an account in AWS with the correct permissions
sudo aws configure
Generate the certificate
sudo certbot certonly --dns-route53 -d 'misp.example.com' --server https://acme-v02.api.letsencrypt.org/directory
All going well you should have the .pem files saved out to /etc/letsencrypt/live/misp.example.com/
Copy over the generated certificate files to the webserver
Navigate to the correct folder
sudo su
cd /etc/ssl/private
Backup the existing keys
mkdir old
cp misp.local.crt old/misp.local.crt
cp misp.local.key old/misp.local.key
Copy over the generated keys
cp /etc/letsencrypt/live/misp.example.com/privkey.pem /etc/ssl/private/misp.local.key
cp /etc/letsencrypt/live/misp.example.com/cert.pem /etc/ssl/private/misp.local.crt
Restart apache
service apache2 restart
Configure MISP
After you have installed MISP, there are a few configuration changes you need to make.
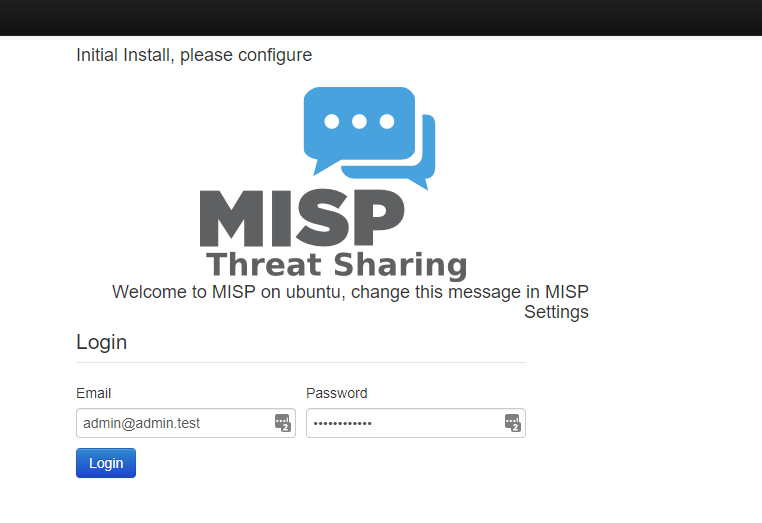
Firstly logon to MISP. The default credentials are:
Username: admin@admin.test
Password: admin
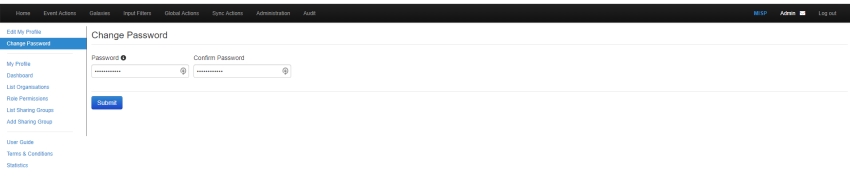
You are prompted to change you password on first logon.
First create a new orginisation. Navigate to Administration > Add Organisation. Add in the Identifier and click Generate UUID. Fill in any other components as required, then hit Submit

Next we need to update some of server settings. Navigate to Administration > Server Settings and Maintenance
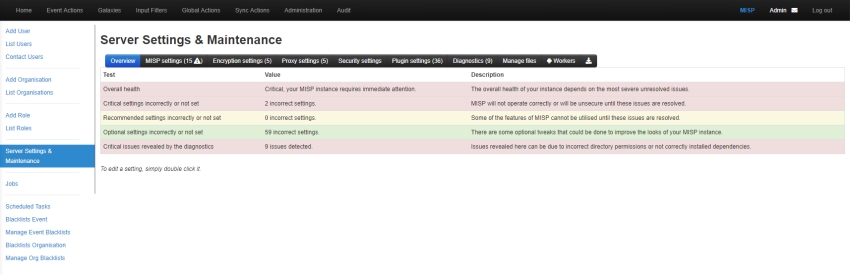
From here you will see a number of critical items that will need addressing. Firstly we need to head into the MISP settings as it is showing a warning. Update the following settings by double clicking on the value:
| Setting | Current Value | New Value |
|---|---|---|
| MISP.baseurl | https://127.0.0.1 | https://misp.example.com |
| MISP.external_base_url | not set | https://misp.example.com |
| MISP.org | ORGNAME | your org name here |
| MISP.host_org_id | ORGNAME | Select the Org you added |
| MISP.welcome_text_top | Initial Install, please configure | Your message here |
| MISP.welcome_text_bottom | Welcome to MISP on ubuntu, change this message in MISP Settings | Your message here |
Have a look through each of the items marked in green. Edit and save them as appropriate (its mostly image file and page layouts), Once you have done this your overview should show something like this.
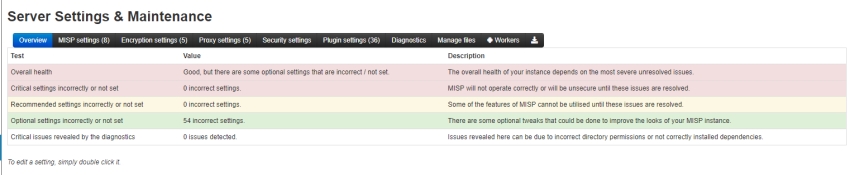
… well overall health is Good…. probably not perfect but should be enough to get started.