By Adrian | October 5, 2019
This is part 11 of the series about TheHive/MISP/Cortex and im covering off an upgrade of Cortex from 2.1.3 to 3.0.0. The other posts for this series can be found here:
Part I - Building TheHive
Part II - Setup reverse proxy for TheHive
Part III - Building MISP
Part IV - Building Cortex
Part V - Adding analyzers to Cortex
Part VI - Setup reverse proxy for Cortex
Part VII - Integrate TheHive and Cortex
Part VIII - Integrate MISP to TheHive
Part IX - Upgrading TheHive
Part X - Updating MISP
Part XI - Upgrading Cortex
Part XII - Wrapup of TheHive, MISP, Cortex
The Github documentation on Cortex isn’t quite as comprehensive as it is for Cortex, but the principals for the upgrade should be roughly the same. These are the steps that I took to upgrade my instance of Cortex.
Backup
The first step is to perform a backup of the Elasticsearch indices, which requires some additional configuration. Create a backup folder location with the following command:
mkdir /opt/backup

# Change the owenership so that the elasticsearch can access it
chown -R elasticsearch:elasticsearch /opt/backup
Edit the /etc/elasticsearch/elasticsearch.yml file and include the following line:
path.repo: ["/opt/backup"]
Now you will need to restart the Elasticsearch service so this change is in effect:
sudo service elasticsearch restart
To perform the backup we need to get the index details, you do this by performing a web request to your Elasticsearch instance which may or may not be same box. Note the index in this case is cortex_2. The number refers to the schema version.
curl 'localhost:9200/_cat/indices?v'

health status index    uuid                   pri rep docs.count docs.deleted store.size pri.store.size
yellow open   cortex_2 PLcBK-wOTgSjXw6RMGy5XQ   5   1         41            3    410.3kb        410.3kb
To register a snapshot use this command.
curl -XPUT 'http://localhost:9200/_snapshot/cortex_backup' -d '{
    "type": "fs",
    "settings": {
        "location": "/opt/backup",
        "compress": true
    }
}'

# Output (if successful)
{"acknowledged":true}
And finally we can create a backup by using this command (replace <INDEX> with the index identified earlier, in this case it will be cortex_2):
curl -XPUT 'http://localhost:9200/_snapshot/cortex_backup/snapshot_1?wait_for_completion=true&pretty' -d '{
  "indices": "cortex_2"
}'

# Output
{
  "snapshot" : {
    "snapshot" : "snapshot_1",
    "uuid" : "W9Pw0zAIRGKawnTDMHVhcg",
    "version_id" : 5061699,
    "version" : "5.6.16",
    "indices" : [
      "cortex_2"
    ],
    "state" : "SUCCESS",
    "start_time" : "2019-09-29T00:33:14.335Z",
    "start_time_in_millis" : 1569717194335,
    "end_time" : "2019-09-29T00:33:15.210Z",
    "end_time_in_millis" : 1569717195210,
    "duration_in_millis" : 875,
    "failures" : [ ],
    "shards" : {
      "total" : 5,
      "failed" : 0,
      "successful" : 5
    }
  }
}
Upgrade Cortex to v3.0.0
Stop cortex service
cd /opt
service cortex stop
Import the PGP key for the-hive project if you dont already have it (Optional but do it)
sudo wget https://raw.githubusercontent.com/TheHive-Project/cortex/master/PGP-PUBLIC-KEY
gpg --import PGP-PUBLIC-KEY

# Output
gpg: /home/thehive/.gnupg/trustdb.gpg: trustdb created
gpg: key 3D99BB18562CBC1C: public key "TheHive Project (TheHive release key) <support@thehive-project.org>" imported
gpg: Total number processed: 1
gpg:               imported: 1
Download and Verify Cortex 3.0.0
cd /opt

sudo wget http://dl.bintray.com/thehive-project/binary/cortex-3.0.0-1.zip
sudo wget http://dl.bintray.com/thehive-project/binary/cortex-3.0.0-1.zip.asc

# Verify the signature file against the download to ensure integrity, cause supply chain thats why
gpg --verify cortex-3.0.0-1.zip.asc cortex-3.0.0-1.zip

# Output
gpg: Signature made Thu 05 Sep 2019 02:10:52 PM UTC
gpg:                using RSA key 3D99BB18562CBC1C
gpg: Good signature from "TheHive Project (TheHive release key) <support@thehive-project.org>" [unknown]
gpg: WARNING: This key is not certified with a trusted signature!
gpg:          There is no indication that the signature belongs to the owner.
Primary key fingerprint: 0CD5 AC59 DE5C 5A8E 0EE1  3849 3D99 BB18 562C BC1C
Extract Cortex files
sudo unzip cortex-3.0.0-1.zip
Now break the Symbolic link cortex and point it at our new 3.0.0 instance. Ensure that your cortex user owns the folder.
sudo rm cortex
sudo ln -s cortex-3.0.0-1 cortex
sudo chown -R /opt/cortex cortex
sudo chown -R /opt/cortex-3.0.0-1 cortex
Next, copy over the existing application.conf file and make a change to it. Pay particular attention to the port number change (from 9300 to 9200), and the line parameter changes from host = to uri =
sudo cp /opt/cortex-2.1.3-1/conf/application.conf /opt/cortex/conf/
sudo nano /opt/cortex/conf/application.conf

# Modify the line "host = ["127.0.0.1:9300"] to be the following:
uri = "http://127.0.0.1:9200"
Now we need to ensure that we are using the cortexutils 2.0.0 module. You can check that by running this command
pip list | grep cortexutils

# Output
cortexutils         2.0.0
If your instance is running and older version, you can upgrade by running this command:
pip2 install cortexutils --upgrade
pip3 install cortexutils --upgrade
NOTE: I ran across an issue where even I thought I had the latest version of cortexutils it was only for one version of python and not both which gave me a few issues elsewhere. As this is a fairly recent build of Cortex I didnt have this issue here.
Once the Elasticserach configuration file and cortexutils package has been updated, restart the cortex service
sudo service cortex start
sudo service cortex status
All going well, cortex should have started successfully without error.
Post upgrade steps
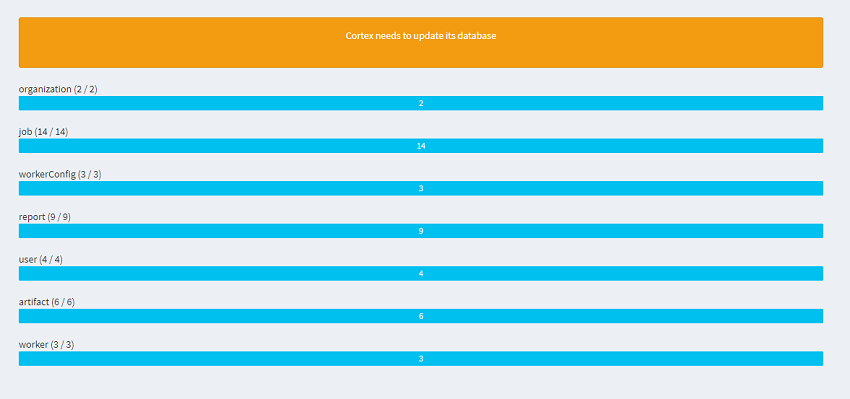
Once the service has restarted and had a few moments to settle, Fire up your browser and navigate to your cortex url. You get the Database upgrade prompt.

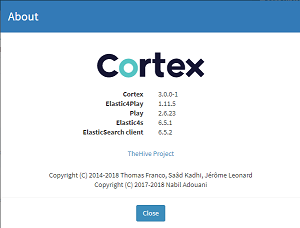
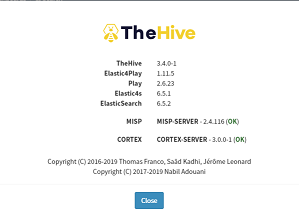
Once you login to Cortex again, select admin, about. You will see the version listed as 3.0.0. If you were to do the same from TheHive you will also see the new version there as well.
| From Cortex | From TheHive |
|---|---|
 |
 |
To confirm the Elasticsearch side, you can run this command (Note there are now 2 indexes):
curl 'localhost:9200/_cat/indices?v'

# Output
health status index    uuid                   pri rep docs.count docs.deleted store.size pri.store.size
yellow open   cortex_2 PLcBK-wOTgSjXw6RMGy5XQ   5   1         41            3    410.3kb        410.3kb
yellow open   cortex_4 CQOcr5UdSAexbrRCvEU4ng   5   1         40            0    137.2kb        137.2kb
You may also want to check that your analysers have retained their settings. This should not be a problem as the settings are stored within the Elasticsearch index.
One new feature that is introduced is running analysers from Docker.
References